What is z0
z0 is a mastering suite for macOS only.
Its design philosophy is "the art of subtraction": audio is delivered straight to the depths of macOS (the HAL), and every process that does not need to be in the signal path has been removed as far as possible.
z0 consists of two components:
- z0app — the Session Manager. A GUI for track management, tool selection, presets and export
- TUI engines — real-time effect processors running in Terminal.app. Launched from z0app; parameters are operated through a text-based UI
System requirements
| Item | Requirement |
|---|---|
| OS | macOS 13 Ventura or later · Apple Silicon only |
| Application | Terminal.app (included with macOS) |
| Audio | A Core Audio compatible audio interface |
| Keyboard input | ASCII (alphanumeric) input source required |
| TUI display | The TUI is designed around alphanumeric text. File names in non-Latin scripts may not align correctly in Terminal, but this has no effect on playback or processing. |
> Note: Keyboard operation in z0app and the TUI assumes an ASCII (ABC / alphanumeric) input source. With a non-Latin input method active (for example Japanese kana or romaji input), keys may not be recognized correctly. Check that the macOS input source is set to ASCII before you begin.
2.1 Memory and playback time
z0 loads the entire audio file into RAM before playing or processing it. This reduces storage access during playback and makes stable processing easier to achieve under given conditions, but the approach has two drawbacks. First, on albums where tracks run together with no gap — a live recording, say — there is a moment of silence between tracks while one buffer is released and the next is filled. Second, the maximum playable file length depends on the free memory in your system.
Free memory does not affect continuous playback of a playlist. Memory is released completely after each track.
The table below scales a measured reference point — 16 GB installed, 11 GB assumed free — proportionally to each RAM size, as a guide.
Maximum playback time by RAM size (guide):
| Sample rate | 8 GB | 16 GB | 32 GB | 64 GB | 96 GB | 128 GB |
|---|---|---|---|---|---|---|
| 44.1 kHz | 32 min | 1h 4min | 2h 9min | 4h 19min | 6h 29min | 8h 39min |
| 48 kHz | 29 min | 59 min | 1h 59min | 3h 58min | 5h 58min | 7h 57min |
| 88.2 kHz | 16 min | 32 min | 1h 4min | 2h 9min | 3h 14min | 4h 19min |
| 96 kHz | 14 min | 29 min | 59 min | 1h 59min | 2h 59min | 3h 58min |
| 176.4 kHz | 8 min | 16 min | 32 min | 1h 4min | 1h 37min | 2h 9min |
| 192 kHz | 7 min | 14 min | 29 min | 59 min | 1h 29min | 1h 59min |
Measured with a 16-channel output device (Lynx Aurora N). z0 allocates its playback buffer to match the device's output channel count, so devices with fewer outputs allow longer playback (a 2-channel device gives roughly 8×). Other running applications may reduce the time actually available. Offline export uses less memory than playback and can handle longer tracks (per-file limit → 4.8 Export).
Installation and license activation
3.1 Installation
- Purchase a plan, or get Lucid Free, at z0mastering.com
- Download the installer from the link you receive
- Follow the installer's instructions
- Launch z0 Session Manager
3.2 License activation
Lucid Free uses the same activation request export and .z0license import steps.
For Reference and z0Suite, complete the following steps on each Mac from the "License" tab in Preferences (Cmd+,) after launch (see 4.13 License).
- Write out an activation request with
[Export activation request...] - Send the request file to us through the contact form
- Load the signed
.z0licenseyou receive back with[Import license...]
After activation, the license is verified offline. One license runs on up to two Macs at the same time; complete the steps above on each Mac. A perpetual license covers the major version you purchased with no expiry, and any update released within 12 months of purchase is free. The free trial for Reference and z0Suite lasts 30 days.
z0app Session Manager
4.1 Launch and layout
For Reference and higher plans, z0app starts with a window containing two or three panes.
Lucid Free hides the sidebar and history panel. Selecting a feature outside your license shows the plan that includes it.
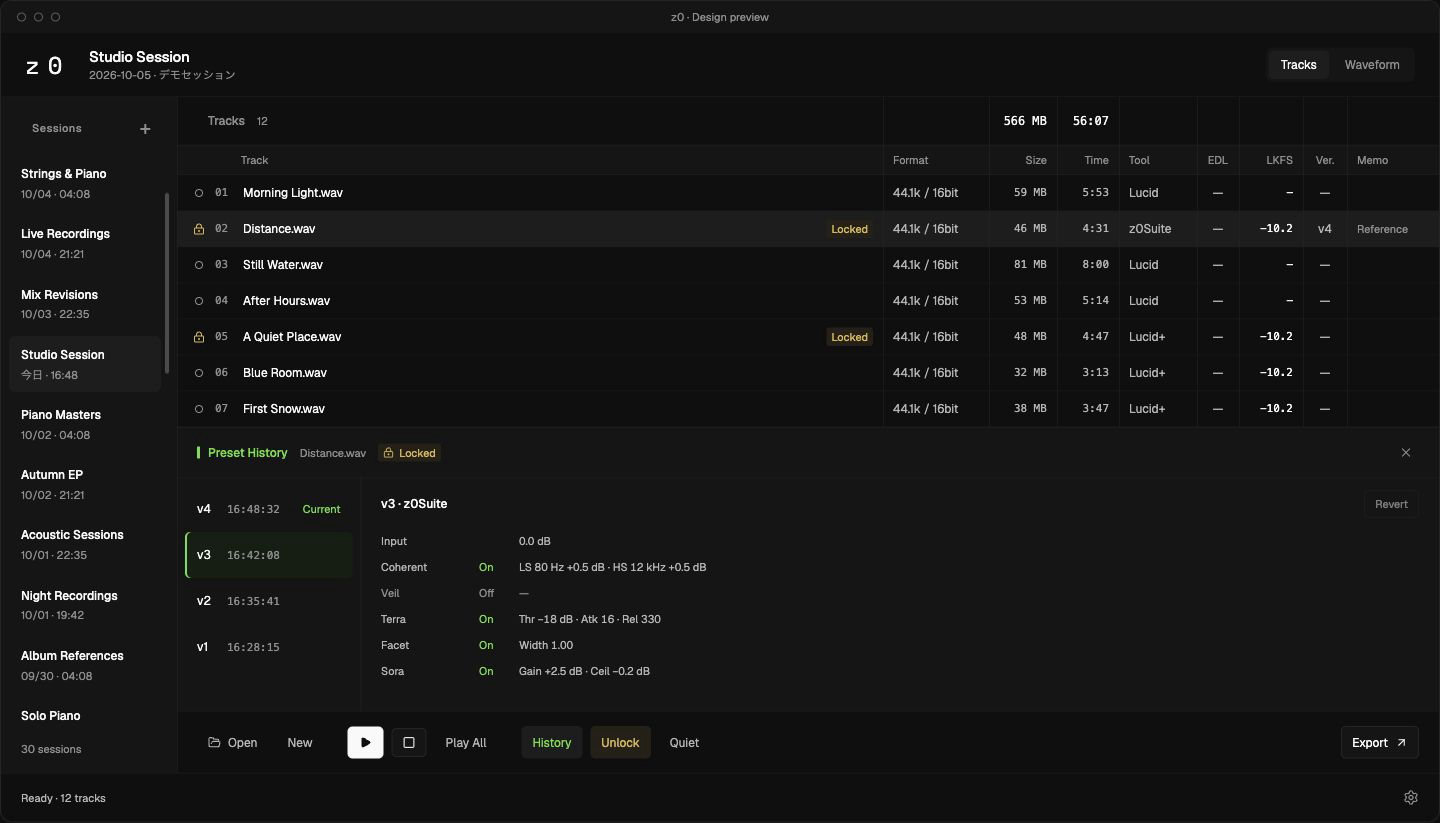
Panes:
| Area | Contents |
|---|---|
| Sidebar (left) | Session name field, session list, [+ New] button |
| Track list (center) | The audio files you have loaded. Drag to reorder |
| History panel (bottom) | Toggled with the H key. Preset history in chronological order |
| Bottom bar | Action buttons and status display |
Moving between panes: Tab cycles Sidebar → Track list → History panel → Sidebar.
Track row columns:
| Column | Contents |
|---|---|
| Status symbol | ○ untouched / ● has preset / ✓ exported / ▶ playing |
| Number | 01, 02, ... |
| File name | Original file name |
| Format | Sample rate / bit depth |
| File size | KB / MB / GB |
| Duration | MM:SS |
| Tool | ◀ Tool Name ▶ — switch with the left and right arrow keys |
| EDL | Shown on files with waveform edits (trim / fade) applied |
| LKFS | The last confirmed whole-track Integrated LKFS. Shown normally when it matches the current tool and preset; dimmed when it is an older value that no longer matches. Without a z0Suite license the cell shows Suite instead of the value |
| Preset version | v1, v2, ... increments on every save (green). Unsaved is —. Save times are recorded in the history panel |
| Note | Inline-editable text |
!SRC warning: If the track's sample rate is not among the audio device's native sample rates, a red !SRC appears (→ 12. Automatic sample-rate switching).
4.2 Sessions
A session is the unit in which working state is saved and restored.
| Action | How |
|---|---|
| New session | Cmd+N or [+ New] in the sidebar |
| Switch session | Click a session name in the sidebar |
| Rename session | With playback stopped, right-click a session in the sidebar → Rename (or edit the open session in the name field at the top of the window) |
| Delete session | Right-click in the sidebar → Delete |
Session file location: ~/Library/Application Support/z0app/ (changeable in Preferences)
Auto-save: Changes are saved automatically. While unsaved changes exist, a • is shown in the window title and the bottom bar.
4.3 Files
Adding files:
| Method | Action |
|---|---|
| File picker | Cmd+O |
| Drag and drop | Drop files onto the window |
Supported formats: WAV, AIFF/AIFF-C, FLAC, MP3, M4A, CAF
> Formats other than WAV: z0's processing engines read WAV. Files in other formats are converted to WAV internally, by the same procedure, for both playback and export. Uncompressed PCM such as AIFF and CAF undergoes a container conversion only; sample values are identical to the original (in theory, no change in sound quality). Compressed formats such as MP3 and M4A involve decoding (see 4.8 Export).
Track operations:
| Action | How |
|---|---|
| Reorder | Drag a track row |
| Remove | Select the track → Cmd+Delete |
| Undo remove | Cmd+Z |
| Edit note | Click the note field and type |
4.4 Tool selection
With the track list pane focused, the ← and → keys switch tools.
Standalone tools
| Tool | Type | Bands | Phase | Precision | Rendering | Peak Jump |
|---|---|---|---|---|---|---|
| Lucid | Playback | — | — | Float32 | — | — |
| Lucid+ | Playback | — | — | Float64 | — | Yes |
| Sculpt | EQ | 4 PK | Minimum | DD ~106-bit | Real time | Yes |
z0Suite (one continuous chain: Coherent → Veil → Terra → Facet → Jasper → Sora)
| Tool | Type | Bands / Parameters | Phase | Precision | Cut switching | GR display |
|---|---|---|---|---|---|---|
| Coherent | Zero-phase EQ | LS+4PK+HS | Zero | DD ~106-bit + Kahan | Low Cut / High Cut 12 · 24 dB/oct | — |
| Veil | M/S de-esser | ThrM / ThrS / Lo / Hi / Knee | Zero / minimum | Kahan ~80-bit | — | GR / Pk GR |
| Terra | Bus compressor | Thr / Grip / Atk / Rel / Tone / Link / MUp / Mix / SC (Lo · Hi) | — | Kahan ~80-bit | — | GR / Max |
| Facet | M/S zero-phase EQ | M:6 S:6 + Sub 0–200% + Width 0–200% | Zero | DD ~106-bit + Kahan | 12 · 24 dB/oct, M/S independent | — |
| Jasper | Multiband compressor | 3 bands: XO Lo / Hi + per-band Thr · Ratio · Atk · Rel · MUp | Zero-phase XO | Kahan ~80-bit | — | Low / Mid / High |
| Sora | 4-band ISP limiter | Depth / Gain / Lo / Hi / HiThr / MS Budget / FB Budget / Ceil / Link | Zero | Kahan ~80-bit | — | MatrixC / MB Lim / MS Clip / FB Lim / Low / Mid / High |
Only three tools — Lucid, Lucid+ and Sculpt — can be selected on their own. Coherent, Veil, Terra, Facet, Jasper and Sora are built into z0Suite and are used from one signal path and one screen (see "z0Suite — integrated mastering suite" below). L2 pre-warping correction is common to every EQ tool, and Peak Jump and Time Jump are available in every tool except Lucid.
Precision
| Precision | Mechanism | Used by |
|---|---|---|
| Float32 | IEEE 754 single precision | Lucid |
| Float64 | IEEE 754 double precision | Lucid+ · the z0Suite pipeline |
| DD ~106-bit | Double-Double (extended precision from a pair of doubles) | Sculpt |
| Kahan ~80-bit | double + Kahan compensated summation | Sora · Jasper · Veil · Terra |
| DD ~106-bit + Kahan | Double-Double + Kahan compensated summation | Coherent · Facet |
From an ordinary programming point of view, Double-Double + Kahan precision in Coherent and Facet may look excessive. Some would call it a waste of CPU.
But in z0 this configuration was not chosen for practical gain alone. The aim was integrity in numerical computation: to remove, as far as possible, the suspicion that something was lost simply by being computed.
The tools
Lucid — 32-bit native player
The free, Float32-based pure playback player that is z0's reference, with nothing left to remove.
Lucid+ — 64-bit player + LKFS measurement + Peak Jump + Time Jump
Lucid extended to a Float64 base, and the foundation for every EQ tool that follows. Includes Peak Jump and Time Jump, and measures the whole-track Integrated LKFS of every track it plays (display in the z0app track list is enabled with a z0Suite license). Its basic playback design is otherwise the same as Lucid. Available with Reference and above.
Sculpt — DD ~106-bit minimum-phase EQ
A 4-band minimum-phase parametric EQ. A high-grade EQ in the manner of a conventional hardware mastering equalizer. The DFII-T biquad state variables are held in Double-Double precision to limit the effect of rounding error. RBJ Audio EQ Cookbook design with L2 pre-warping correction. Available with Reference and above.
z0Suite — integrated mastering suite
An integrated tool that gathers Coherent → Veil → Terra → Facet → Jasper → Sora into one signal path. The six are not offered or selectable as standalone tools. Each is described, with its operation, in 6. Tool guide.
| Tool | Role | Guide |
|---|---|---|
| Coherent | 6-band zero-phase EQ | 6.2 |
| Veil | M/S dynamic de-esser | 6.6 |
| Terra | VCA-style compressor | 6.7 |
| Facet | M/S zero-phase EQ + Sub + Width | 6.3 |
| Jasper | 3-band multiband compressor | 6.4 |
| Sora | 4-band × M/S ISP limiter | 6.5 |
4.5 Playback
| Action | How |
|---|---|
| Play selected track | Return / double-click / [Play] button |
| Stop | q / [Stop] button |
| Play all tracks in sequence | [Play All] button |
| Stop all | [Stop All] button / q |
When playback starts:
- z0app opens a new tab in Terminal.app (or reuses an existing one)
- The TUI binary for the selected tool is launched with the file path as its argument
- For tracks with a tool assigned, the saved preset is loaded automatically
During playback, z0app's bottom bar shows the status as ▶ 02 filename [Tool Name].
Play All mode: Plays every track from the top in order. When each track finishes, the next starts automatically.
4.6 Presets
Pressing Shift+S in the TUI EQ engine saves the preset and updates z0app automatically. Even without Shift+S, the preset is saved automatically when the track ends or when playback is stopped with q.
| Action | How |
|---|---|
| Save preset | Shift+S in the TUI |
| Copy preset | Cmd+C in z0app (copies the selected track's preset) |
| Paste preset | Cmd+V in z0app (pastes onto the selected track) |
Automatic band-count conversion: When a preset is copied between tools with different band counts, the band layout is converted internally.
4.7 Preset history
The H key shows and hides the history panel.
Each track's preset history is listed newest first, showing:
- Save time
- Input Gain
- EQ and other tool settings
Reverting from history:
- Focus the history panel (
Tab) - Select a preset with
↑↓ - Press
Returnto revert to the selected preset
Revert is non-destructive: a new entry is created with the selected preset's values. (Locked tracks cannot be reverted.)
4.8 Export
Open the Export window with Cmd+E or the [Export] button. Select locked tracks, then set the destination, filename, and output format in the same window before pressing [Export].
- Choose the tracks to export (a list of locked tracks; all are selected by default)
- Choose a destination folder with [Choose...] under [Destination]
- The selected tracks are processed in sequence in the background
- Progress is shown in a progress bar
Choosing tracks to export:
When you run an export, a list of locked tracks appears first. Tracks you uncheck are excluded from this run. [All] / [None] toggle the whole list.
Filename suffix: Enter text under [File name] → [Filename suffix] to add it after the original name and before the output file extension. Use _441 and _48, for example, to distinguish rate versions. The default is _z0; [Default] restores it. Your choice is remembered for the next Export.
Output settings: Under [Output], choose Float64, 24 bit, or 16 bit for [Bit depth]. For a 16-bit Sculpt source, [Match input format] and [Upgrade to 24 bit] are available. [Sample rate] offers [Same as master] or 44.1 / 48 / 88.2 / 96 / 176.4 / 192 kHz. For 16- or 24-bit output at a different rate, choose Short FIR or Steep FIR under [Conversion]. [Ceiling] for 16- or 24-bit output ranges from 0.0 to −6.0 dB and defaults to −0.2 dB.
Example output when Float64 is selected:
01_track1_z0.wav
02_track2_z0.wav
03_track3_z0.wav
eq_sheet.txt      ← EQ settings sheet
With 16- or 24-bit selected, the destination receives only the WAV at the requested bit depth and rate. The Float64 intermediate master, verification JSON, and eq_sheet.txt are not placed there.
eq_sheet.txt records the following for each track:
- File name and note
- Tool used
- Input Gain and every tool's parameters
- Preset save time
Handling of input formats:
| Input | On export |
|---|---|
| WAV | Processed as-is (no conversion) |
| AIFF / AIFF-C / CAF (uncompressed PCM) | Container conversion to WAV. Sample values identical to the original |
| FLAC / MP3 / M4A | Converted to WAV. Compressed formats involve decoding |
Input conversion happens automatically just before export, and the converted file is discarded afterwards. For tracks converted during a Float64 export, eq_sheet.txt records a Source: afconvert ... line.
Output bit depth:
- Choose Float64 to save z0Suite's arithmetic result as 64-bit float (IEEE 754 double precision) WAV
- In Float64 mode, tracks with no EQ, tools, or waveform edits are copied as-is (format and extension unchanged)
- Choose 16 or 24 bit to pass the Float64 intermediate master to ZCON internally and save the requested PCM WAV
z0Suite's internal pipeline is Float64. After processing a 16-bit or 24-bit input, the signal holds finer values internally than the input did. Float64 output records the chain's result without rounding. For 16- or 24-bit delivery, ZCON makes the final bit-depth decision from the same Float64 intermediate result.
For ZCON, which converts the 64-bit float master to delivery formats such as 44.1 kHz / 16-bit, see 10. ZCON.
Maximum file length: Float64 output or the Float64 intermediate master for 16- / 24-bit delivery meets the 4 GB limit of the RIFF format first. The limit is about 101 min at 44.1 kHz, 93 min at 48 kHz, 50 min at 88.2 kHz, 46 min at 96 kHz, 25 min at 176.4 kHz and 23 min at 192 kHz. Tracks that exceed it stop before the file is created and are reported as not exported.
When export completes, the track's status changes to ✓.
If some tracks could not be exported:
A track that cannot be exported does not stop the batch; the rest are processed to the end. The completion dialog lists the tracks that could not be exported and why. For Float64 output, the same list is recorded at the end of eq_sheet.txt (NOT EXPORTED). Only tracks whose files were actually written change to ✓, so the track list tells you as well.
4.9 Lock
Lock a track with Cmd+L or the [Lock] button.
While locked, the following are restricted:
- Tool changes (← →)
- Preset paste (Cmd+V)
- Revert from history
Locked track rows are shown with a yellow background. Use it to guard finalized settings against accidental change.
Only locked tracks are exported. Locking declares "this setting is final" and doubles as the gateway to export (see 4.8 Export).
4.10 Project files
Separately from sessions, work can be saved and reopened as a project file (.z0proj).
| Action | Shortcut |
|---|---|
| Save project | Cmd+S |
| Save as | Cmd+Shift+S |
| Open project | Cmd+Shift+O |
Project files are JSON and contain every track, the preset history and tool settings.
4.11 Preferences
Cmd+, opens the Preferences window.
| Setting | Description |
|---|---|
| Session folder | Where session data is stored. [Choose...] to change, [Default] to restore the default |
| Peak navigation | Number of peaks to detect (default 20, range 1–256) and minimum spacing between peaks (default 4.0 s, range 0.5–30 s) |
| Output device | Output device selection (Auto = system default). [Refresh] re-detects devices. Native sample rates are read from the device automatically, and files at unsupported rates show the !SRC warning |
| Source sample rate | For z0Suite playback and export only: convert 44.1 / 48 / 88.2 kHz mono or stereo linear PCM (WAV / AIFF / CAF) to a 96 kHz Float64 working copy with ZCON before loading (44.1 / 48 kHz with Short FIR, 88.2 kHz with Steep FIR). Files at 96 / 176.4 / 192 kHz retain their original rate. A mono source becomes stereo with L = R |
| Quiet Mode | Choose which background processes Shift+Q suspends (see 4.12 below) |
| CoreAudio Recovery | [Reset CoreAudio] restarts coreaudiod. For recovery when the audio path misbehaves (password required) |
96 kHz working rate
In Preferences → "Playback", switch on "z0Suite playback: 44.1 / 48 / 88.2 kHz mono/stereo WAV / AIFF / CAF → 96 kHz (44.1 / 48: Short FIR; 88.2: Steep FIR)", then play or export a 44.1 kHz, 48 kHz or 88.2 kHz mono or stereo linear PCM file (WAV, AIFF or CAF) with z0Suite. Before playback, z0 creates a 96 kHz / 64-bit float working copy with ZCON and uses that copy for playback, waveform editing, z0Suite processing and export from then on. 44.1 kHz and 48 kHz sources are converted with the Short FIR upsampling coefficients, 88.2 kHz sources with Steep FIR (for the character of each type, see 10. ZCON). Files at 96 kHz or above retain their original rate. The conversion completes offline; this is not a feature that inserts an SRC into the real-time signal path. It applies to z0Suite only: Lucid, Lucid+ and Sculpt play the original file at its original rate. The default is Off.
The original file is never modified. The working copy and its conversion record .z0conv.json are stored in a z0-96k folder created automatically next to the original, and reused thereafter as long as the original's SHA-256 is unchanged. The working copy carries a record of the conversion method and coefficients; an older working copy made with a different method (for example a 44.1 / 48 kHz 96k version made with the earlier Reference method) is not reused and is remade on the next playback. They are not deleted automatically; delete z0-96k by hand when you no longer need it.
Converted tracks show "→96k" in the format column. A track whose conversion fails shows the reason and is loaded at its original rate. Changing the setting does not affect tracks already added. Compressed formats and files with three or more channels are out of scope. Files at 96 / 176.4 / 192 kHz load at their original rate. AIFF and CAF sources have their container — and only their container — rewritten to WAV before ZCON sees them (afconvert -f WAVE reorders bytes; not one sample value changes). Their working copy is then named z0-96k/<original file name>.wav. A mono source is duplicated to stereo before ZCON sees it, the same samples in L and R with no gain compensation. Playback, waveform editing, z0Suite processing and export are therefore all stereo (L = R) from then on, and the exported master is stereo too.
What changes: No information absent above the original signal's Nyquist frequency is restored. Precisely, the feature "unfolds the original 44.1 / 48 / 88.2 kHz signal onto a 96 kHz computational grid and runs the subsequent EQ, dynamics and limiter at 96 kHz". That is why we call it a "96 kHz working rate", not "hi-res conversion". The benefit lies chiefly in four places.
- EQ — Coefficients are computed from the session rate, and frequencies are limited to just below Nyquist. At 48 kHz, high-frequency filters close to the 24 kHz Nyquist suffer frequency warping and bandwidth compression; at 96 kHz the audible band sits well away from the 48 kHz Nyquist, leaving room for curves around 10–24 kHz. This is not a gain in numerical precision but room in the frequency plane in which the filters are realized.
- True peak — Sora's 2× upsampled detection grid rises from 96 kHz equivalent to 192 kHz equivalent, capturing inter-sample peaks more readily (ITU-R BS.1770 gives 4× oversampling for 48 kHz and about 2× for 96 kHz as examples; z0's detector is not the ITU-specified FIR itself).
- Non-linear processing — Sora's clip kernel uses 8× oversampling, so its internal rate rises from 384 kHz to 768 kHz, further reducing the aliases that fold back into the audible band. 48 kHz is already a high standard; this is a diminishing improvement toward the safe side.
- Time resolution — Attack, release and the like keep their millisecond values, but peak shapes and gain sequences are evaluated on twice as many points. Because the block is fixed at 4096 frames (about 85.3 ms at 48 kHz, 42.7 ms at 96 kHz), the same preset does not give identical results at 48 kHz and 96 kHz. This is not a defect; it is the nature of running rate-dependent DSP at 96 kHz.
Comparing 48 kHz playback with 96 kHz playback directly changes three things at once: the SRC, z0's DSP and the DAC's operating mode. At 96 kHz, file size, memory use and computation also increase. When delivering at 44.1 / 48 kHz, check the true peak after the final SRC in ZCON's conversion record.
References: Robert Bristow-Johnson, Audio EQ Cookbook (frequency warping under the BLT) / Sophocles Orfanidis, Digital Parametric Equalizer Design with Prescribed Nyquist-Frequency Gain (prewarping near Nyquist) / ITU-R BS.1770-3, Annex 2 / Kahles, Esqueda, Välimäki, Oversampling for Nonlinear Waveshaping: Choosing the Right Filters, JAES 2019
4.12 Quiet Mode
Quiet Mode is an auxiliary feature that temporarily reduces background activity unrelated to audio processing. Toggle it with the [Quiet] button at the bottom of the window or Shift+Q. Fifteen items can be selected individually, and Quiet ON is established only when every selected item has been changed and verified.
The purpose is to reduce variation in the environment during playback and create conditions that favor comparative listening. The size of the effect depends on the Mac's configuration, resident apps, connected devices and what you are doing. It does not guarantee an audible difference in every case.
This feature affects the OS and other applications. No problems have been reported, but we cannot accept responsibility for any that may arise. Use only the items you need, at your own discretion.
One-time setup (required if you use Spotlight & Time Machine):
Quiet Mode's sudo commands run in Terminal.app. To stop Spotlight indexing reliably, enable Terminal under macOS "System Settings" → "Privacy & Security" → "Full Disk Access". If Terminal is not listed, add /System/Applications/Utilities/Terminal.app with [+]. After changing the setting, quit Terminal completely and let z0 relaunch it.
Without Full Disk Access, verification that Spotlight has stopped fails even after the administrator password is entered, and Quiet ON is not established. Rather than continuing as "partially enabled", z0 restores the items it had already changed. This permission grants Terminal access to a wide range of the Mac; set it only once you understand what it means.
Toggles:
| Toggle | Target | sudo |
|---|---|---|
| Spotlight & Time Machine | Stop Spotlight indexing and freeze its workers; temporarily disable Time Machine | Yes |
| Bluetooth | Suspend Bluetooth | Yes |
| Wi-Fi | Suspend wireless LAN | No |
| Photo & Media analysis | Freeze ML analysis of photos and video | No |
| Learning & Personalization | Freeze behavior learning and the suggestion engine | No |
| iCloud & Apple Remote | Freeze iCloud sync and Apple's remote A/B testing | No |
| Siri & Intelligence | Freeze the Siri and Apple Intelligence foundation | No |
| Nearby device scanning | Freeze AirDrop / Handoff device discovery | No |
| Widgets & Weather | Freeze widget updates and weather data fetching | No |
| Overbridge Engine | Freeze the Elektron Overbridge Engine | No |
| superwhisper | Freeze superwhisper voice input | No |
| Quit Google Chrome | Quit Google Chrome | No |
| Quit Safari | Quit Safari | No |
| Aqua Voice | Freeze Aqua Voice | No |
| Quit Finder | Quit Finder (equivalent to Cmd+Q) | No |
sudo items: Spotlight & Time Machine and Bluetooth require system privileges. When switched on, Terminal prompts for your password (cached for five minutes, so a single entry is enough during continuous use).
Status display and restoration: While Snapshotting... → Activating... is in progress, playback, preview, Export and settings toggles are unavailable. Only after every item is verified does the display turn to a green Quiet ON. During re-verification just before playback it reads Refreshing..., and while switching off it reads Restoring....
If Time Machine was running, Quiet ON stops it, and Quiet OFF restores and verifies the previous Running / AutoBackup / volume state. If even one item fails restoration verification, Recovery required is shown with the unrestored items, and the ledger is kept. Retry with [Recovery]. The first error is shown on screen, and Details gives the diagnostic.
If you quit in the middle of a refresh or restoration, Quit and Recover Next Launch does not treat the process as successful and keeps the ledger. On the next launch it is loaded as Recovery required, ahead of normal playback. If a ledger from the older v0.16.91 is detected, "recovering from an older ledger" is shown, and nothing other than Wi-Fi, whose original state can be proved, is changed automatically.
Notes:
- With Wi-Fi or Bluetooth off, network connections and Bluetooth devices are, naturally, unavailable during playback
- Quit Google Chrome / Quit Safari / Quit Finder relaunch only the bundles that were running at snapshot time, on Quiet OFF or Recovery, and verify their launch and identity. Bundles not running at snapshot time are not launched
4.13 License
Licenses are checked and managed in the "License" tab of the Preferences window.
| Item | Description |
|---|---|
| Name | The name printed on the mastering sheet |
[Export activation request...] | Write out an activation request for this Mac |
[Import license...] | Load a signed .z0license |
| Status | Current license state, covered major version and license type |
The terms of use (number of licensed devices, reissue, restrictions, warranty and liability) are set out in the End User License Agreement, and the handling of personal information in the Privacy Policy.
4.14 Waveform editing (Edit)
The waveform editor lets you set a track's start point and end point, the lengths of its fade-in and fade-out, and Input Level (level automation) while looking at the waveform. The original audio file is left untouched (edits are stored in a .z0edl sidecar), and edits can be redone as many times as you like.
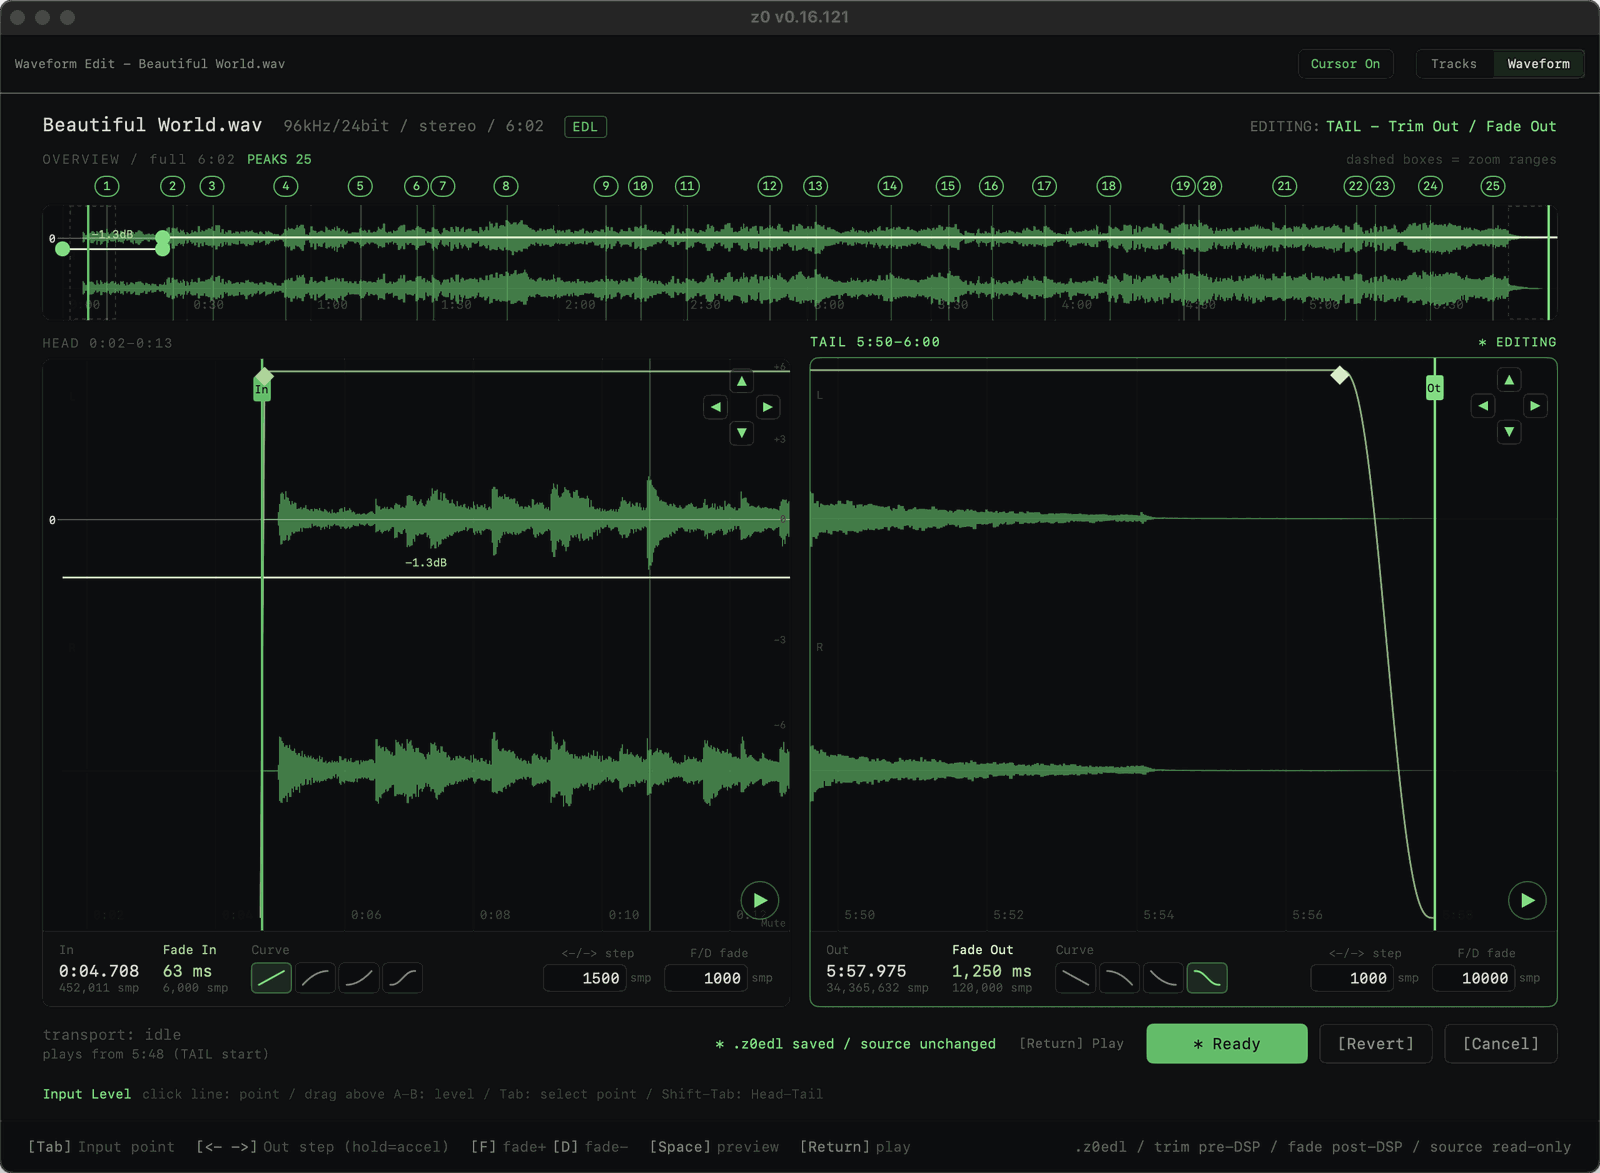
Opening:
| Action | How |
|---|---|
| Open waveform editor | Cmd+D / File menu "Edit Waveform..." / [Edit] in the bottom bar |
| Return to track list | Cmd+D / [Tracks] in the toolbar / [Cancel] |
The waveform editor opens for a track that is not playing. [Tracks] / [Waveform] at the top of the window switch the view.
Layout:
| View | Contents |
|---|---|
| Overview | The whole track's waveform. A dashed frame marks the range shown in the detail (zoom) windows below. Click the background to move the HEAD window there and see any part of the track in detail |
| Peak numbers | Above the overview, the same numbers as Peak Jump. A thin vertical line inside the waveform marks each exact position. Click a number to move the HEAD window there; the audition starts 4 seconds before the peak |
| Input Level | A single line over the waveform. The "0" at the left edge marks 0 dB (unity) |
| HEAD | The start of the track. Edit the start point and fade-in |
| TAIL | The end of the track. Edit the end point and fade-out |
Shift+Tab switches between HEAD and TAIL (Tab also switches when there are no Input Level points). With [Cursor On] in the toolbar, the playhead line is shown and the HEAD window pages along with it.
Note: the preview / audition sound in HEAD and TAIL is not z0's pure playback path. Confirm both, then press Return to proceed to z0 playback.
Editing:
| Key | Action |
|---|---|
← → | Move the selected point (start / end) backward or forward. Accelerates when held |
Shift+← Shift+→ | Move in 10× steps |
F / D | Lengthen / shorten the fade |
Shift+F / Shift+D | Change the fade length in 10× steps |
Space | Audition. HEAD plays from the start point (or the position chosen in the overview) to the end point without stopping; TAIL plays the last 10 seconds before the end point |
Tab | Select the Input Level points in turn (switches HEAD / TAIL when there are none) |
Return | Advance (HEAD → TAIL → confirm → play) |
Cmd+↑ Cmd+↓ | Vertical (amplitude) zoom |
Cmd+← Cmd+→ | Horizontal (time) zoom |
The step size and fade unit can be changed by typing values into the fields at the bottom of the window. Drag the waveform background left or right to scroll the view.
Fade curves: Choose the fade shape from Lin (linear) / Log / Exp / S-curve.
Input Level automation: Edit the line over the waveform to write level changes before playback.
| Action | Result |
|---|---|
| Click on the line | Add an edit point. Click an existing point again to delete it |
| Drag a point | Move it in time and level. Near 0 dB it snaps to 0 dB |
| Drag above the line between two points | Move that span as a block. Nothing outside the span changes. The stretch before the first point / after the last point moves the same way, as if a point sat at the start / end of the track |
| Fields at the bottom | Type the selected point's seconds / frame / dB directly. [Mute] sets full silence |
The range is Mute (−∞ dB) to +6 dB. Every point and span that is not at 0 dB shows its value (for example -2dB / +0.7dB). Level steps are joined automatically by a short S-curve of at least 5 ms, so playback stays smooth with nothing to notice. A track with no edit points bypasses the automation system altogether (the same applies when every point sits at 0 dB). Input Level applies only to z0Suite playback and export; Lucid / Lucid+ / Sculpt ignore it (the points are still saved).
Confirming and applying:
| Button | Action |
|---|---|
| [Ready] | Confirm the edit |
| [Return] | Play with the confirmed edit |
| [Revert] | Discard the edit and restore the original state (full length, no fades) |
| [Cancel] | Close the editor and return to the track list |
Confirmed edits are applied to both playback and export. Edited tracks show an EDL mark in the track list.
Playback cursor: [Cursor On/Off] in the toolbar shows or hides the cursor that marks the playback position during audition and playback (Off by default).
4.15 Menus
z0app menu:
- Preferences... (
Cmd+,) - Quit z0app (
Cmd+Q)
File menu:
- New Session (
Cmd+N) - Open Files... (
Cmd+O) - Save Project (
Cmd+S) - Save Project As... (
Cmd+Shift+S) - Open Project... (
Cmd+Shift+O) - Export... (
Cmd+E) - Edit Waveform... (
Cmd+D; returns to the track view from the waveform editor) - Toggle Quiet Mode (
Shift+Q)
Edit menu:
- Undo Remove (
Cmd+Z) - Cut (
Cmd+X) - Copy (
Cmd+C) - Paste (
Cmd+V) - Select All (
Cmd+A) - Remove Track (
Cmd+Delete) - Toggle Lock (
Cmd+L)
TUI DSP engine
When z0Suite is selected in z0app and a track is played, a TUI (text user interface) appears in Terminal.app. All tool parameters are operated in this TUI.
5.1 TUI layout
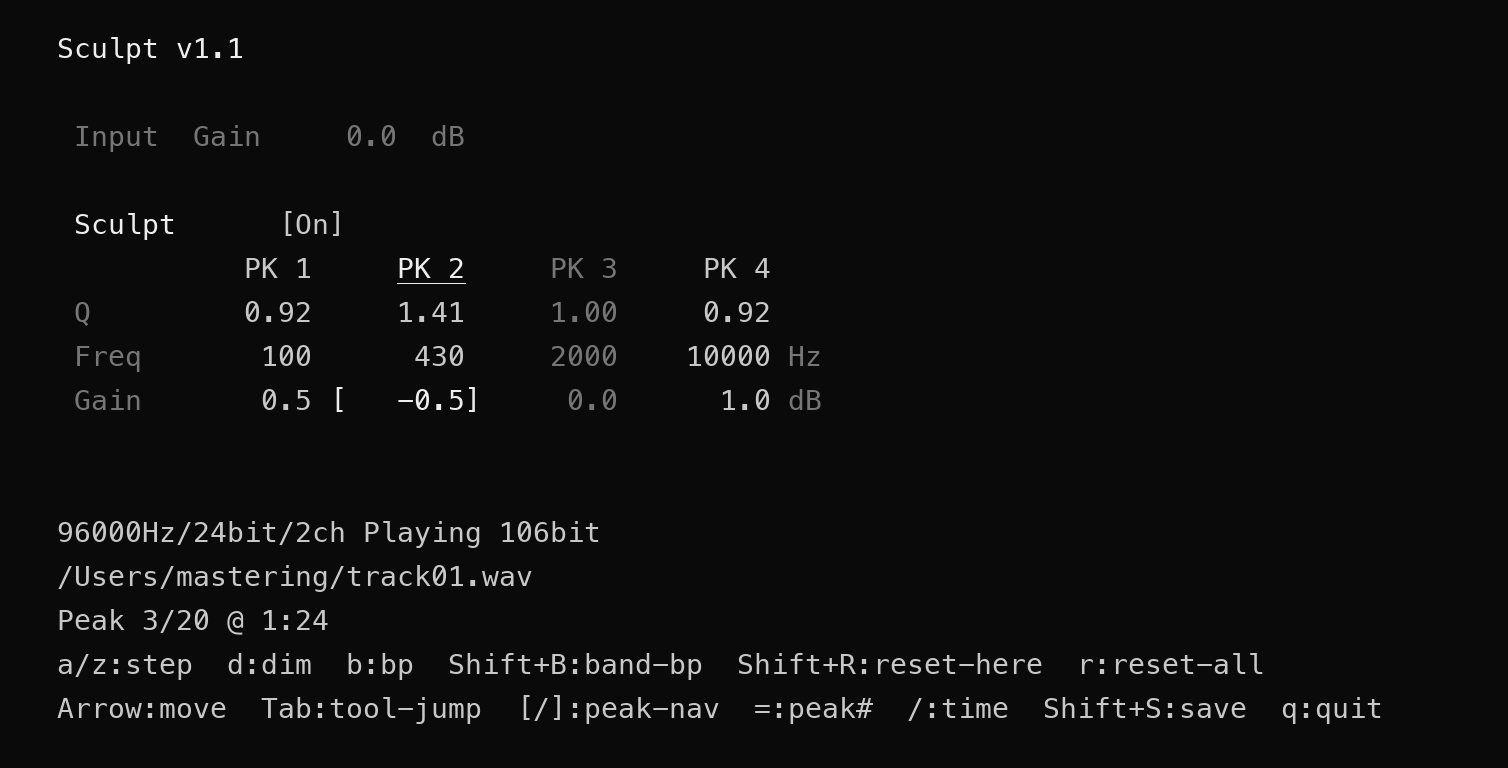
4-band mode (Sculpt):
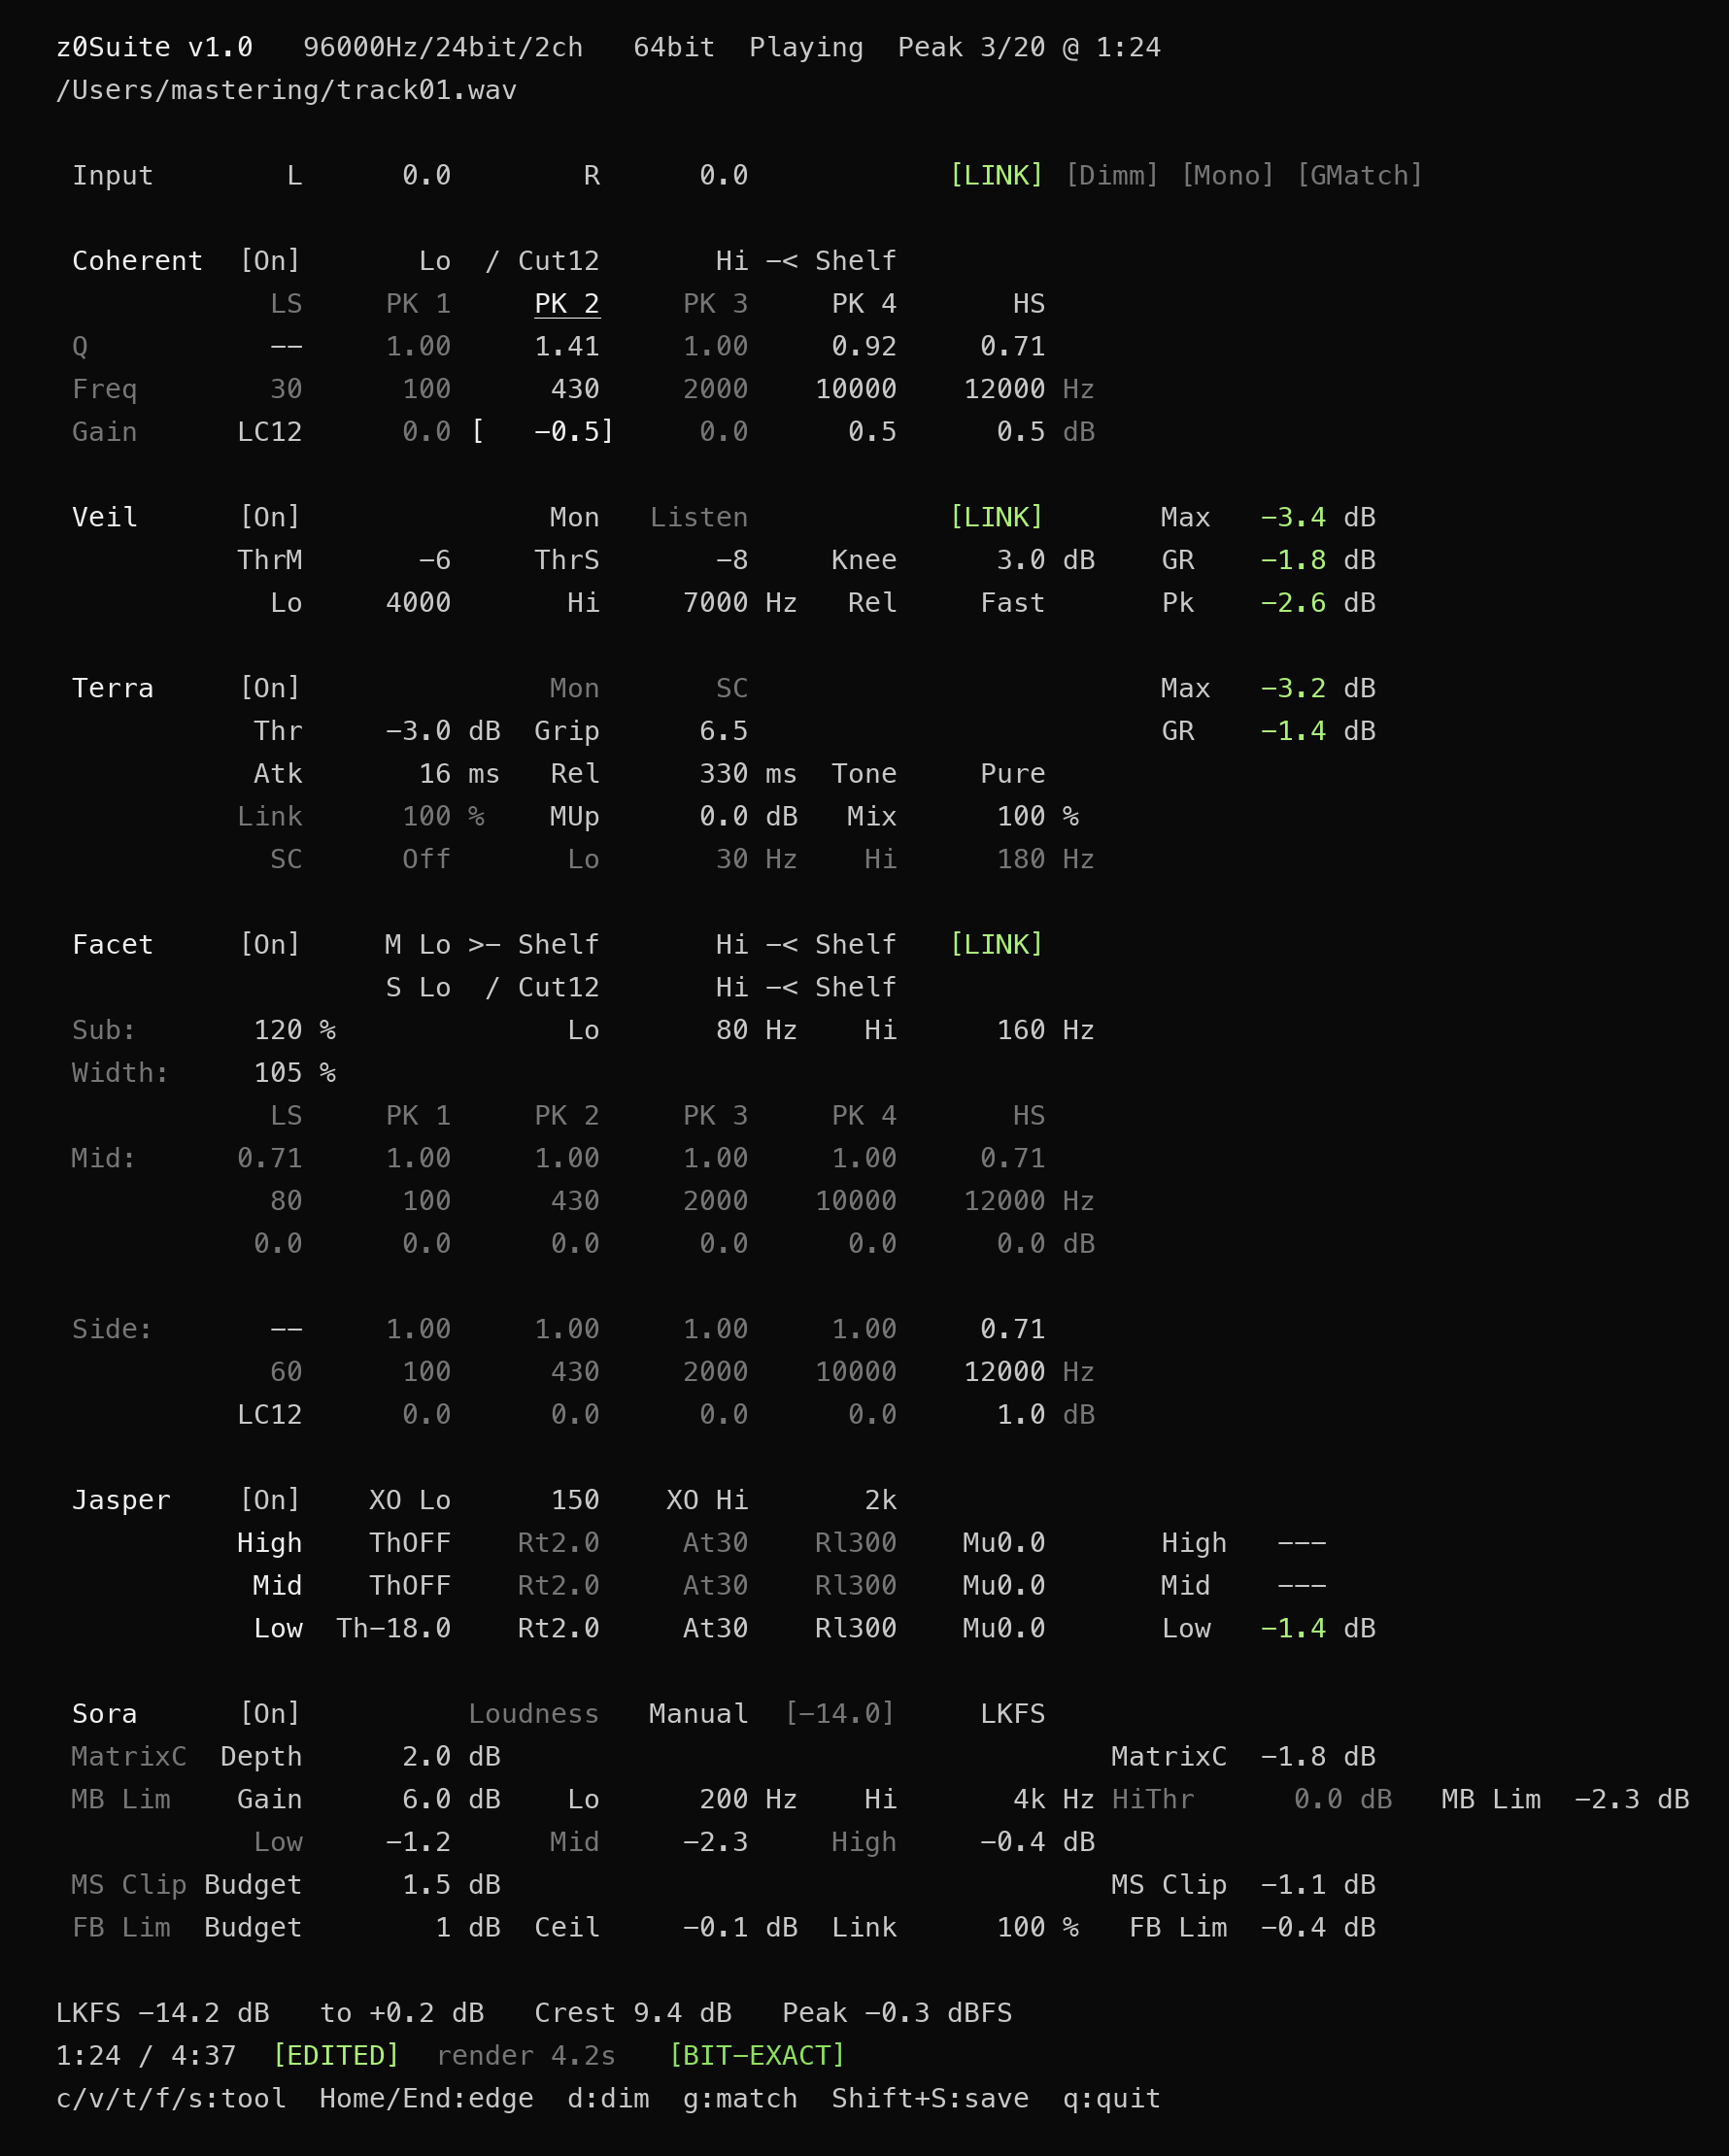
z0Suite (whole screen):
The six tools are stacked from the top in the order Coherent → Veil → Terra → Facet → Jasper → Sora.
6-band EQ (Coherent within z0Suite):

M/S EQ (Facet within z0Suite):
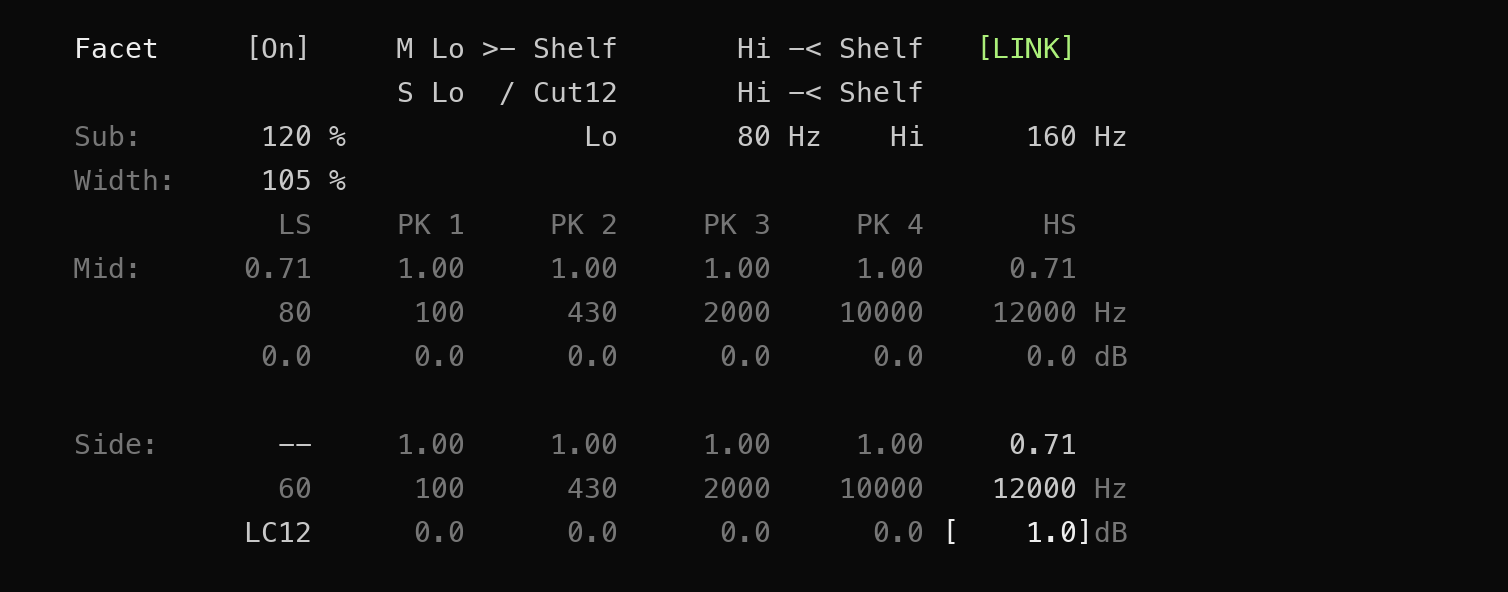
With every tool off, the screen stays as it is and only the arithmetic leaves.
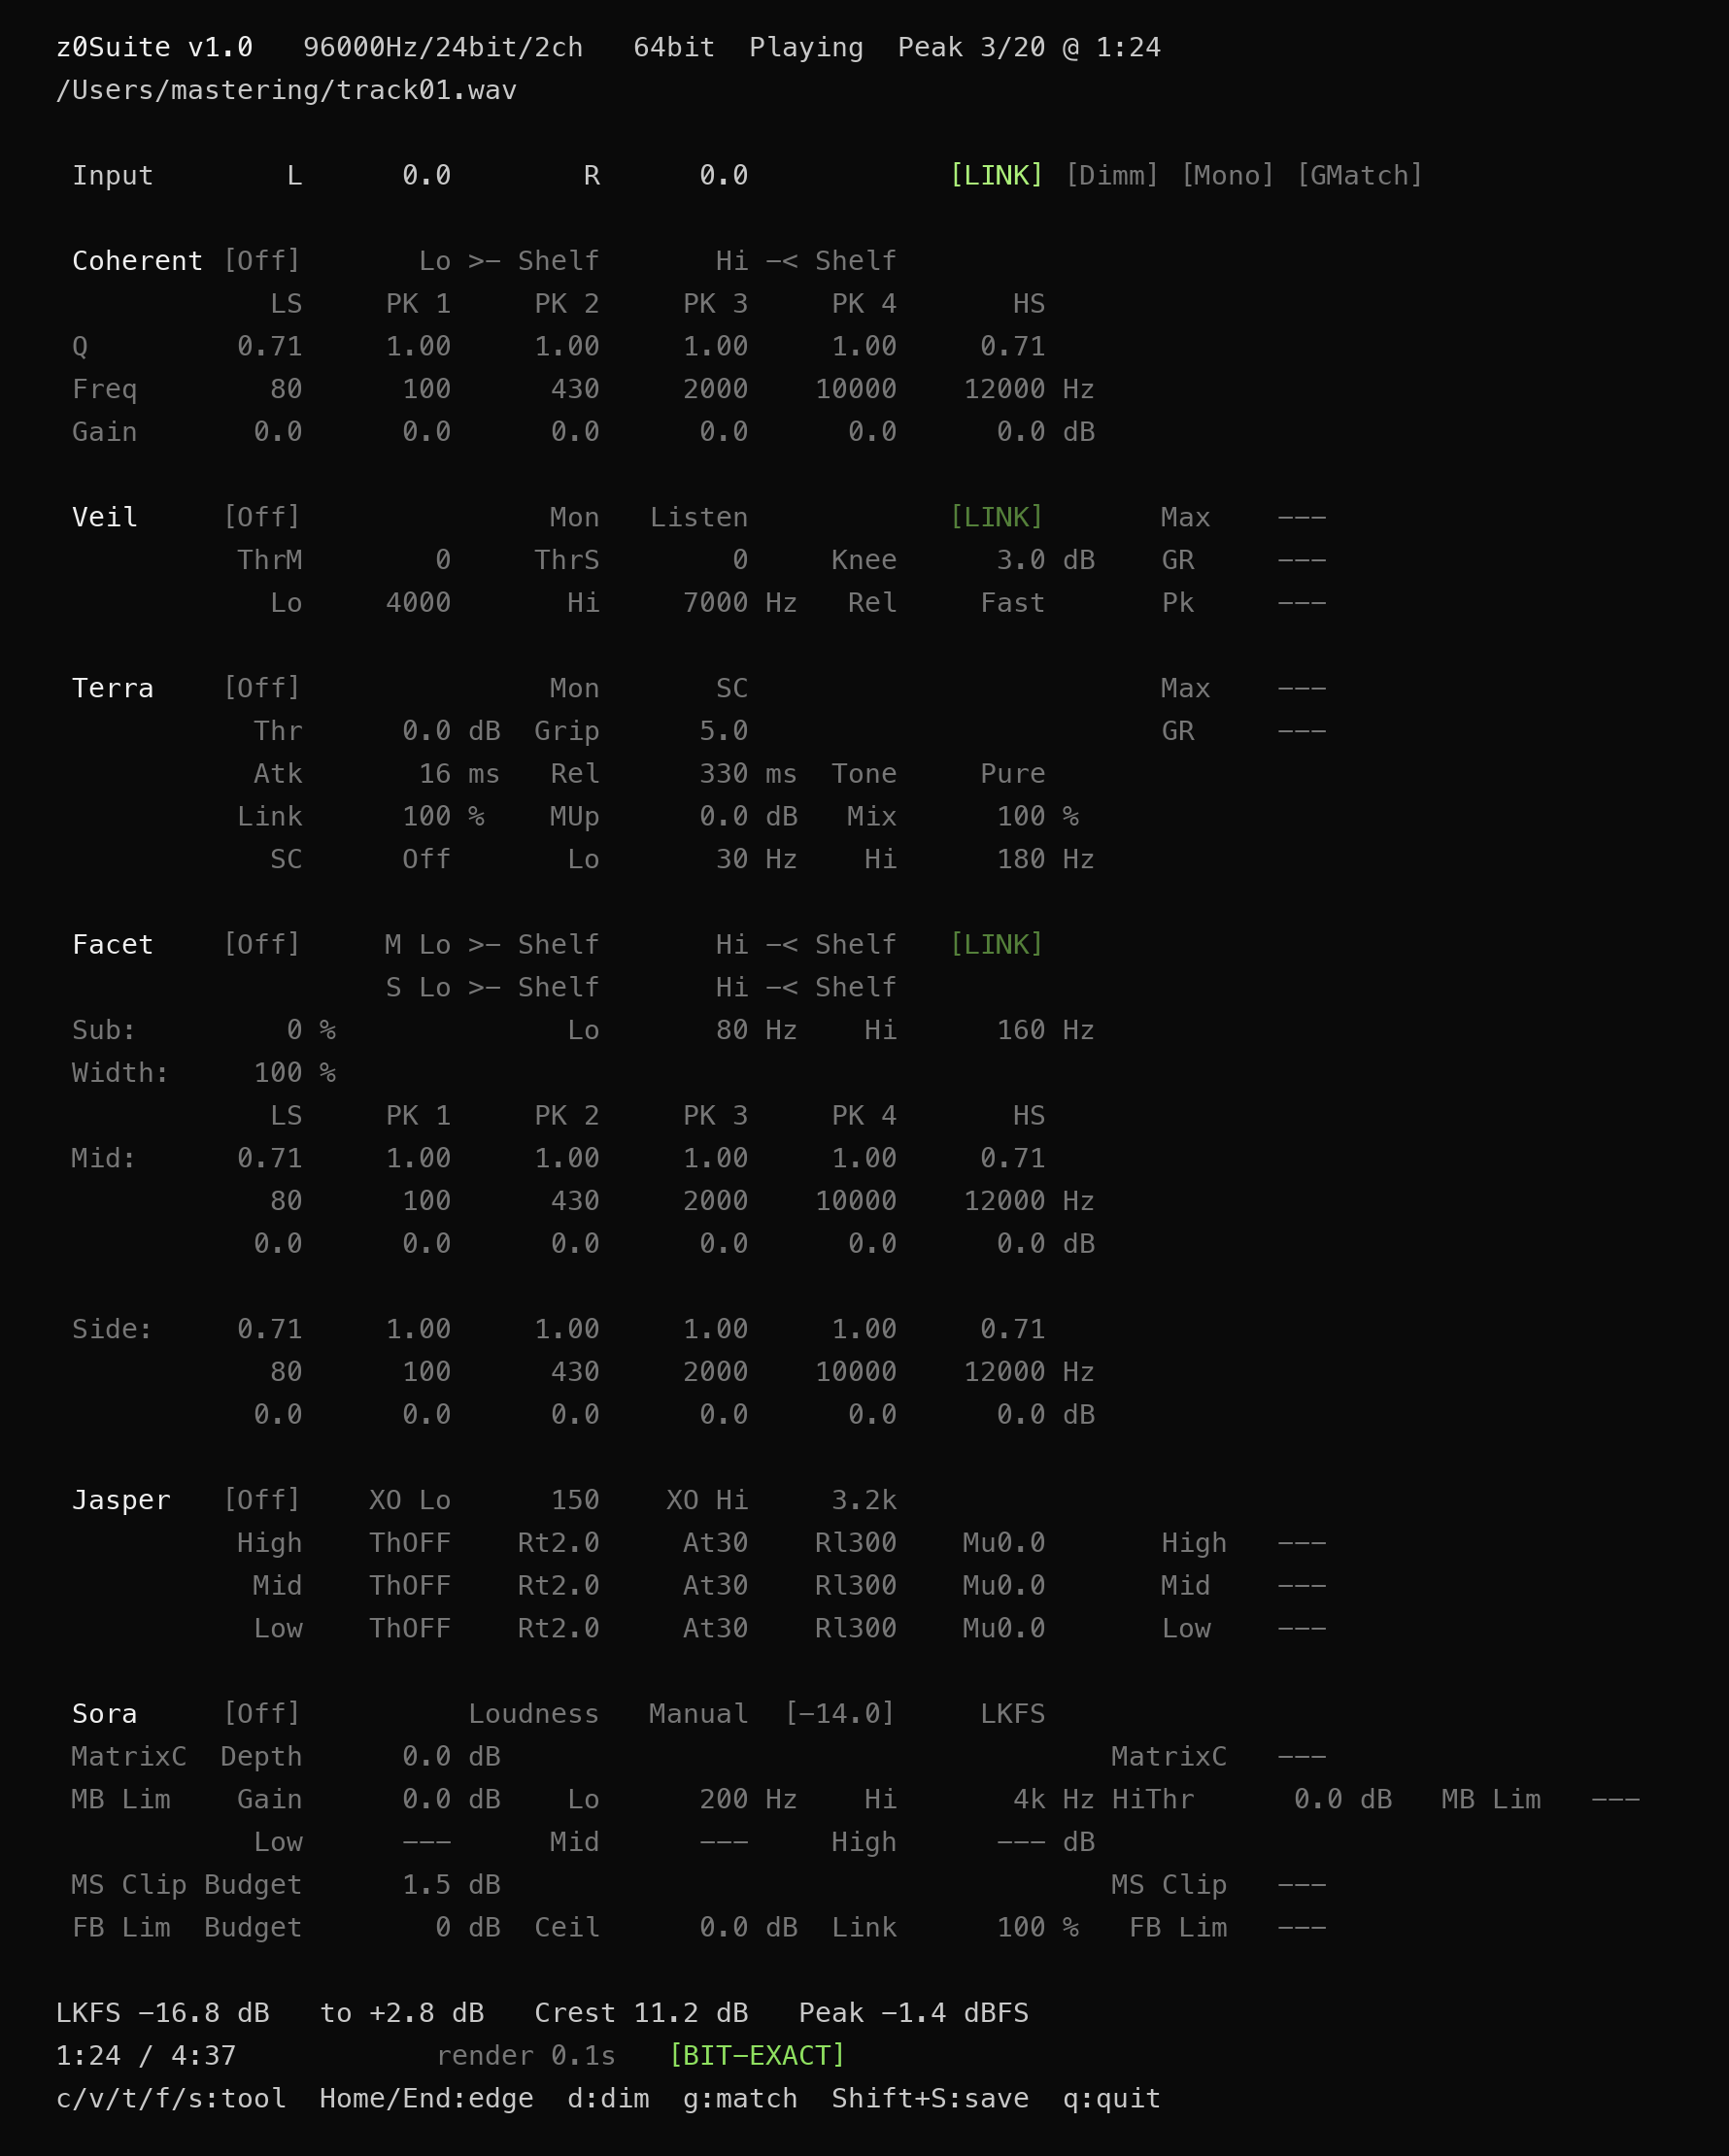
Screen elements:
| Row | Contents |
|---|---|
| Row 1 | Tool name and version; sample rate / bit depth / channel count; precision; playback state; peak position |
| Row 2 | Path of the file being played |
| Input row | L / R input gain (for the whole chain) and the [LINK] / [Dimm] / [Mono] / [GMatch] badges |
| Tool header rows | Tool name with [On] / [Off], Shelf/Cut switching, [LINK], and each tool's badges (Mon / Listen / SC; for Sora, Loudness with Manual / [Auto] and the target LKFS) |
| LKFS row | Output loudness, difference from target, Crest, Peak |
| Time row | Position / duration, [EDITED], rendering status, [BIT-EXACT] / [transient] / [MONITOR] |
| Help row | Key reference (h toggles the detailed view) |
The active band header is highlighted. The selected cell is normally shown bold and underlined (EQ band cells are additionally enclosed as [ value], as before).
In z0Suite, an edited value is dimmed gray until the change reaches the sound at the current playback position, even while selected. The underline continues to mark the selection. The value returns to its normal color when the sound reflects the change, without moving the cursor. This indicates the update at the current position; whole-track confirmation is shown separately by [BIT-EXACT] (see 6.1).
Measurements such as gain reduction, and badges such as [LINK] / [Listen] / [Dimm] / [Mono] / [GMatch] / [EDITED] / [BIT-EXACT], are shown in green; parameters that are Off or in a zero-cost state, and purely structural labels (Time: / XO: / Sub: / Width: / Mid: / Side: / Loudness), are dimmed.
5.2 Navigation
| Key | Action |
|---|---|
Tab | Jump to the next tool / section |
c / v / t / f / j / s | Jump to the first row of Coherent / Veil / Terra / Facet / Jasper / Sora (z0Suite) |
Home / Page Up | Jump to the top |
End / Page Down | Jump to the bottom |
↑ | Move to the row above, or the section above |
↓ | Move to the row below, or the section below |
← | Move left within the row |
→ | Move right within the row |
Tab is not a key that steps through fields; it is a shortcut for moving quickly between the Input row and each tool's header. In z0Suite it cycles through the tool headers Input → Coherent → Veil → Terra → Facet → Jasper → Sora; in Sculpt it alternates Input → tool header. Fine movement between parameters is done with the arrow keys.
5.3 Entering parameters
With a field focused, you can type a value directly.
| Key | Action |
|---|---|
0–9 | Numeric entry (the first keystroke clears the field) |
. | Decimal point |
- | Minus sign |
k / K | kHz suffix (multiplies the value by 1000; e.g. 1.5k → 1500 Hz) |
Backspace | Delete the last character |
Enter | Confirm and apply the value |
Input ranges:
- Frequency: 10 Hz to (sample rate × 0.499) Hz
- Gain: −10.0 dB to +10.0 dB
- Q: free entry in Sculpt and Facet (values outside the table are accepted). Coherent's peaking bands select from P1–P6
- S (shelf slope): free entry
Input Gain (independent L/R with Link)
L and R in the Input row are per-channel input gains applied before the whole of z0Suite. Select L, R or [LINK] with ← →; on L or R, A / Z move in 0.5 dB steps, and typing a value followed by Enter sets it directly. The range is −10.0 to +10.0 dB on each side.
The L key toggles L/R Link. Link is ON at launch: changing one side applies the same change to both, and any existing L/R offset is preserved. For example, with L = −1.0 dB and R = +0.5 dB, moving L by +1.0 dB gives L = 0.0 dB and R = +1.5 dB. When a value is typed directly, the change on the typed side is likewise applied to the other.
With Link OFF, only the selected side changes. Returning Link to ON while the two sides differ does not equalize them on the spot; from then on the same change is applied to both. The Link state and the L/R values are saved in the preset and applied on export. Pressing Shift+R on the Input row returns L/R to 0.0 dB while preserving the Link state.
5.4 Stepped entry (A/Z keys)
Values can be stepped up and down along their tables.
| Key | Action |
|---|---|
A | One step up from the table entry nearest the current value |
Z | One step down from the table entry nearest the current value |
Changes made with the A/Z keys are applied immediately (no Enter needed).
5.5 Bypass, reset, save
| Key | Action |
|---|---|
d | Toggle Dimmer (monitoring aid) |
g | Toggle Gain Match (monitoring aid) |
m | Toggle Mono preview (monitoring aid; only with the cursor on the Input row) |
h | Toggle the detailed help row |
b | Toggle all-bypass. [BYPASS] is shown |
Shift+B | Bypass at the cursor: the tool on a tool row, or only that band on an EQ band |
Shift+R | Reset at the cursor: the tool on a tool row, or only that band on an EQ band, to its defaults |
Ctrl+R | Factory reset. Returns every parameter to its default. Hold control and press R. A plain r does nothing (guards against accidental wipes) |
Shift+S | Save preset. Writes the current EQ settings to file and notifies z0app automatically |
q | Quit. Saves automatically first if there are unsaved changes |
Monitoring aids (Dimmer / Gain Match / Mono)
Dimmer (d), Gain Match (g) and Mono preview (m on the Input row) are monitoring aids. Each changes only how the monitor sounds, at the final stage of the chain; none of them affects the tools' behavior, the preset, or the export in any way. If you quit a session with a monitoring aid engaged, the next time you open it your settings are restored as they were, and the export contains sound entirely unrelated to the monitoring aid.
Dimmer (d) is a temporary attenuator for comparative listening. It lowers the monitor output by 10 dB at the final stage; press d again to restore.
Gain Match (g) matches the listening level at the passage you are checking. It measures short-term loudness over approximately three seconds ahead of the current position, comparing the source with the processed sound, including Input Gain and all active tools. Their difference adjusts the monitor output. This measures the loudness loss caused by limiting as well, rather than simply subtracting Sora's Gain setting. You can use g outside the Input row as well.
The adjustment is measured when you switch g On. While Gain Match is On, returning from whole-chain bypass with b measures again at that position. Switching local bypass with Shift+B, in either direction, matches the level of the side you were just hearing. To compare Sora alone, use Shift+B with the cursor on Sora.
The adjustment stays fixed during the comparison. Later edits to Gain or other settings, and moving to another position, do not make it follow automatically. Neither completion of a measurement nor confirmation of whole-track LKFS changes the listening level on its own. To match another passage or setting, switch g Off and On, or return from bypass. The match applies to the average loudness of the sampled passage; it does not guarantee a match across the whole track or at every instant.
If the passage is not yet ready, is silent, or has less than one second remaining at the end of the track, the message is gmatch: window not ready and the previous adjustment is retained. On the first attempt, the level remains unchanged. Nothing is applied automatically later; repeat the operation once the passage is ready. Gain Match cannot be newly engaged during Mono preview or whole-chain bypass. It can be combined with Dimmer. When typing a value, confirm it with Enter before pressing g.
The operation message in the time row shows the adjustment. Whole-track LKFS measurement and display remain available, separately from the local Gain Match measurement. If a positive adjustment takes the peak above 0 dBFS, the monitor clips, but the export is unaffected.
Mono preview (m) folds the chain's final output to L+R mono, so mono compatibility — phase collapse, bands that go thin — can be checked.
[Dimm] [Mono] [GMatch] are always shown at the right end of the Input row: green when engaged, dimmed when off. For the time row while an aid is engaged, see 6.1.
Shift+B and Shift+R are shortcuts that act only at the cursor position, separate from the whole-screen operations of b / Ctrl+R. Shift+R on Input returns Input Gain to its default.
5.6 Peak Jump
Peak Jump automatically detects the peak positions in a track and jumps between them with the [ and ] keys, so you can audition just the passages where compression or limiting works hardest, one after another.
Behavior:
- Peak positions are detected automatically when the file loads (once, before playback)
]jumps to the next peak (playback starts 4 seconds before the peak)[jumps to the previous peak (before the first peak, it jumps to the start of the track, 0:00)
Rapid movement by repeated presses:
Pressing [ or ] repeatedly moves forward or back by as many peaks as you press. During the presses only the Peak N/M counter on screen advances; the actual seek runs once when you release, so however fast you press, you arrive at the target peak without lag.
Direct jump by number:
Press = to enter direct-jump mode; a Peak jump: _ prompt appears.
=starts direct-jump mode- Type the peak number (e.g.
1then2for the 12th peak) Enterconfirms and jumps to that peakEscor=cancelsBackspacedeletes one character
A number greater than the peak count is clamped automatically to the highest peak.
Number of peaks: The number of peaks and the minimum spacing are set under "Peak navigation" in Preferences (→ 4.11 Preferences). Peaks are found in descending order of amplitude and then sorted in time order.
5.7 Time Jump
Time Jump moves to any position in the track by typing a time directly, so you can go straight to the bar or passage you want to check without being tied to peak positions.
Press / to enter time-entry mode; a Time: _ prompt appears. Any playback position can be given in "minutes.seconds" form.
/starts time-entry mode- Type the time with digits and a single
.(e.g.02.36for 2 min 36 s) Enterconfirms and jumps to that positionEscor/cancelsBackspacedeletes one character
Examples:
02.36→ 2 min 36 s.45→ 0 min 45 s3.→ 3 min 0 s156(no dot) → interpreted as 156 seconds
A time beyond the end of the file is clamped automatically to the end.
Tool guide
z0Suite gathers Coherent → Veil → Terra → Facet → Jasper → Sora into one signal path and treats zero-phase EQ, de-essing, compression, M/S stereo processing, multiband compression and limiting as one continuous chain. Everything mastering needs is operated from a single TUI screen, which shows the gain reduction of each tool together with the output's LKFS (loudness), crest factor and peak (dBFS).
Each tool is switched On and Off with Space. A tool switched off leaves the signal path, and its arithmetic is not performed at all. With every tool off, z0Suite returns to the same pure playback as Lucid+. Even when a tool is On, the EQs skip the DSP of any band at Gain 0 dB, and bypass the whole EQ engine when every band is at 0 dB.
6.1 Rendering and the [BIT-EXACT] indicator
z0Suite prioritizes applying edits to the sound at the current playback position. This includes switching a tool On for the first time and changing Facet Sub: you can listen and keep working without waiting for whole-track confirmation. An edited value is temporarily dimmed gray while the update at the current position is pending, and returns to its normal color when reflected in the sound. This is separate from whole-track confirmation.
Once editing pauses, z0Suite re-renders the whole chain definitively in the background. When it completes, the display changes to [BIT-EXACT]. This means that the sound now playing is the same result as exporting the file from the top with these settings. Export records the chain's Float64 result as-is, and playback is a listening view of that result reduced to Float32, so the sound you hear while [BIT-EXACT] is shown is the offline export, reduced only to playback precision.
The time row also shows how long the render took (render 3.4s).
> On input formats: Files in other formats are converted to WAV by the same procedure for both playback and export, so playback and export match in the same way. For compressed formats such as MP3 and M4A, however, decoding intervenes during conversion, and bit-for-bit identity with the original file is not guaranteed (see 4.3 Files).
With a monitoring aid engaged — the [MONITOR] indicator:
While Dimmer, Gain Match or Mono preview is engaged, the normal status indicator is [MONITOR]. This means you are listening with a monitoring aid; it does not certify the whole-track master. With Dimmer or Gain Match, whole-track LKFS and Peak are display-corrected to remove the monitoring level adjustment, while Crest is unchanged; they are shown in their normal color. For very quiet material, LKFS may differ from a measurement taken with the monitoring aid Off. They remain dimmed during Mono preview, while whole-track values are unconfirmed, or during bypass. During edits, the previous consistent measurement may be retained. The local Gain Match measurement replaces neither whole-track LKFS nor the [BIT-EXACT] check. Rendering progress or an operation message may take priority in the time row.
To protect a finalized setting, lock the track with Lock.
6.2 Coherent zero-phase EQ
6-band zero-phase EQ TUI:
Coherent is a zero-phase EQ that applies each band's filter twice, once forward and once backward. Only the amplitude changes; the phase stays at 0° across the whole band. The arithmetic runs in DD ~106-bit + Kahan compensation, keeping the numerical errors that tend to appear in the low end, or in complex settings, under control.
| Band | Type | Default frequency | Meaning of the Q/S row |
|---|---|---|---|
| LS | Low Shelf (m switches to Low Cut 12 / 24 dB/oct) | 80 Hz | S (slope) 0.30–1.50 |
| PK 1–4 | Peaking | 100 / 430 / 2k / 10k Hz | Bandwidth position P1–P6 |
| HS | High Shelf (m switches to High Cut 12 / 24 dB/oct) | 12 kHz | S (slope) 0.30–1.50 |
Peak bandwidth (P1–P6): The A/Z keys on the Q/S row select from P1 (widest) to P6 (narrowest). Typing a value fixes Q at that value (the Q/S row reads CUSTOM); pressing A/Z again returns to P1–P6 from the nearest position.
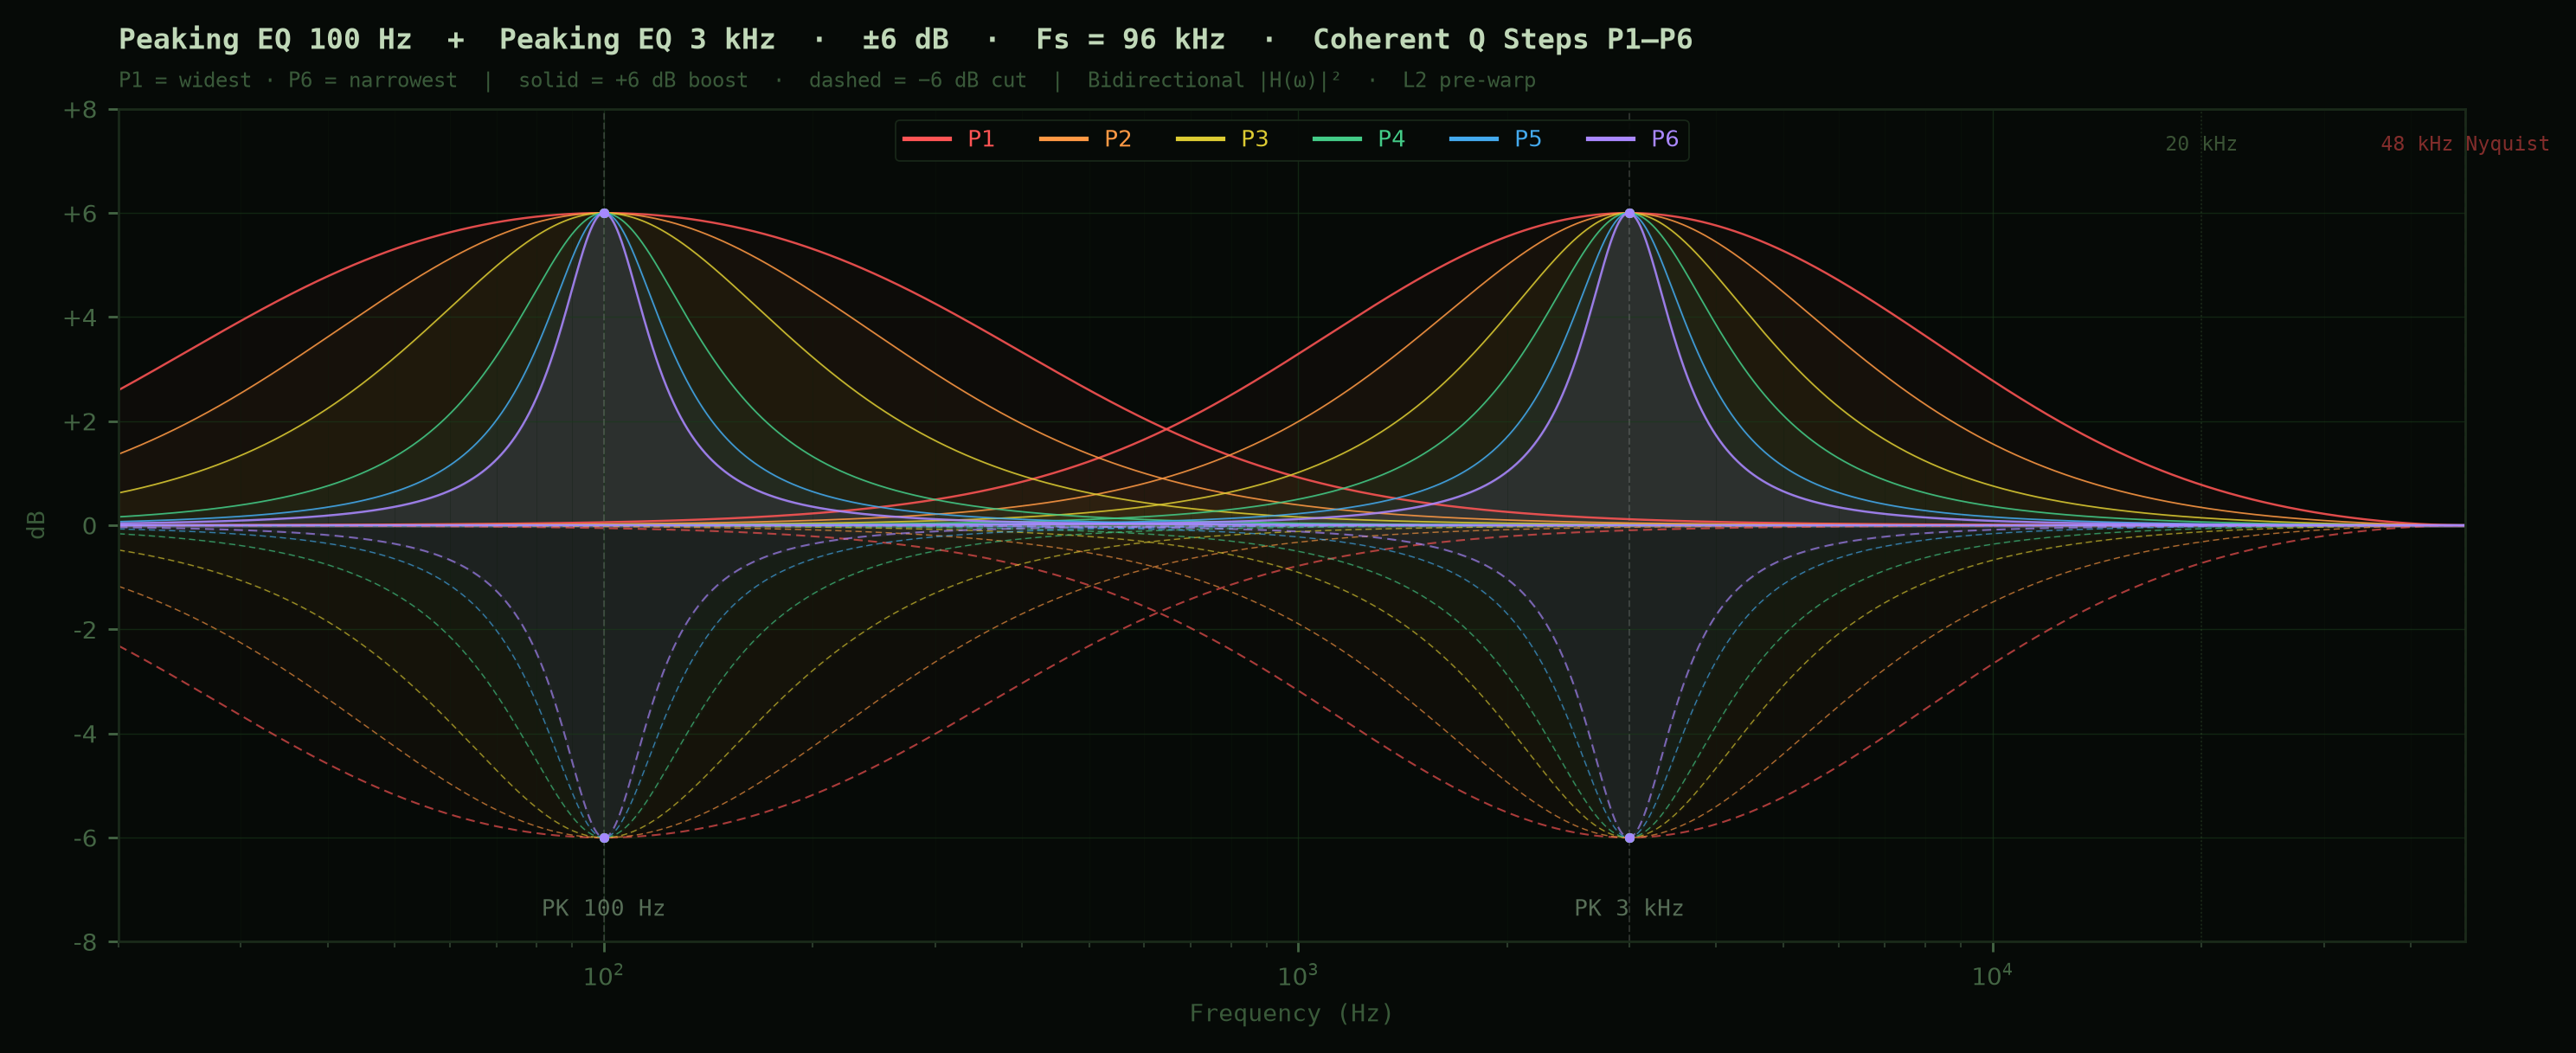
Shelf slope (S): The shelves at either end choose their shoulder shape by S (0.30 / 0.50 / 0.71 / 1.00 / 1.50) rather than Q. Smaller values give a gentler rise, larger values a steeper one.
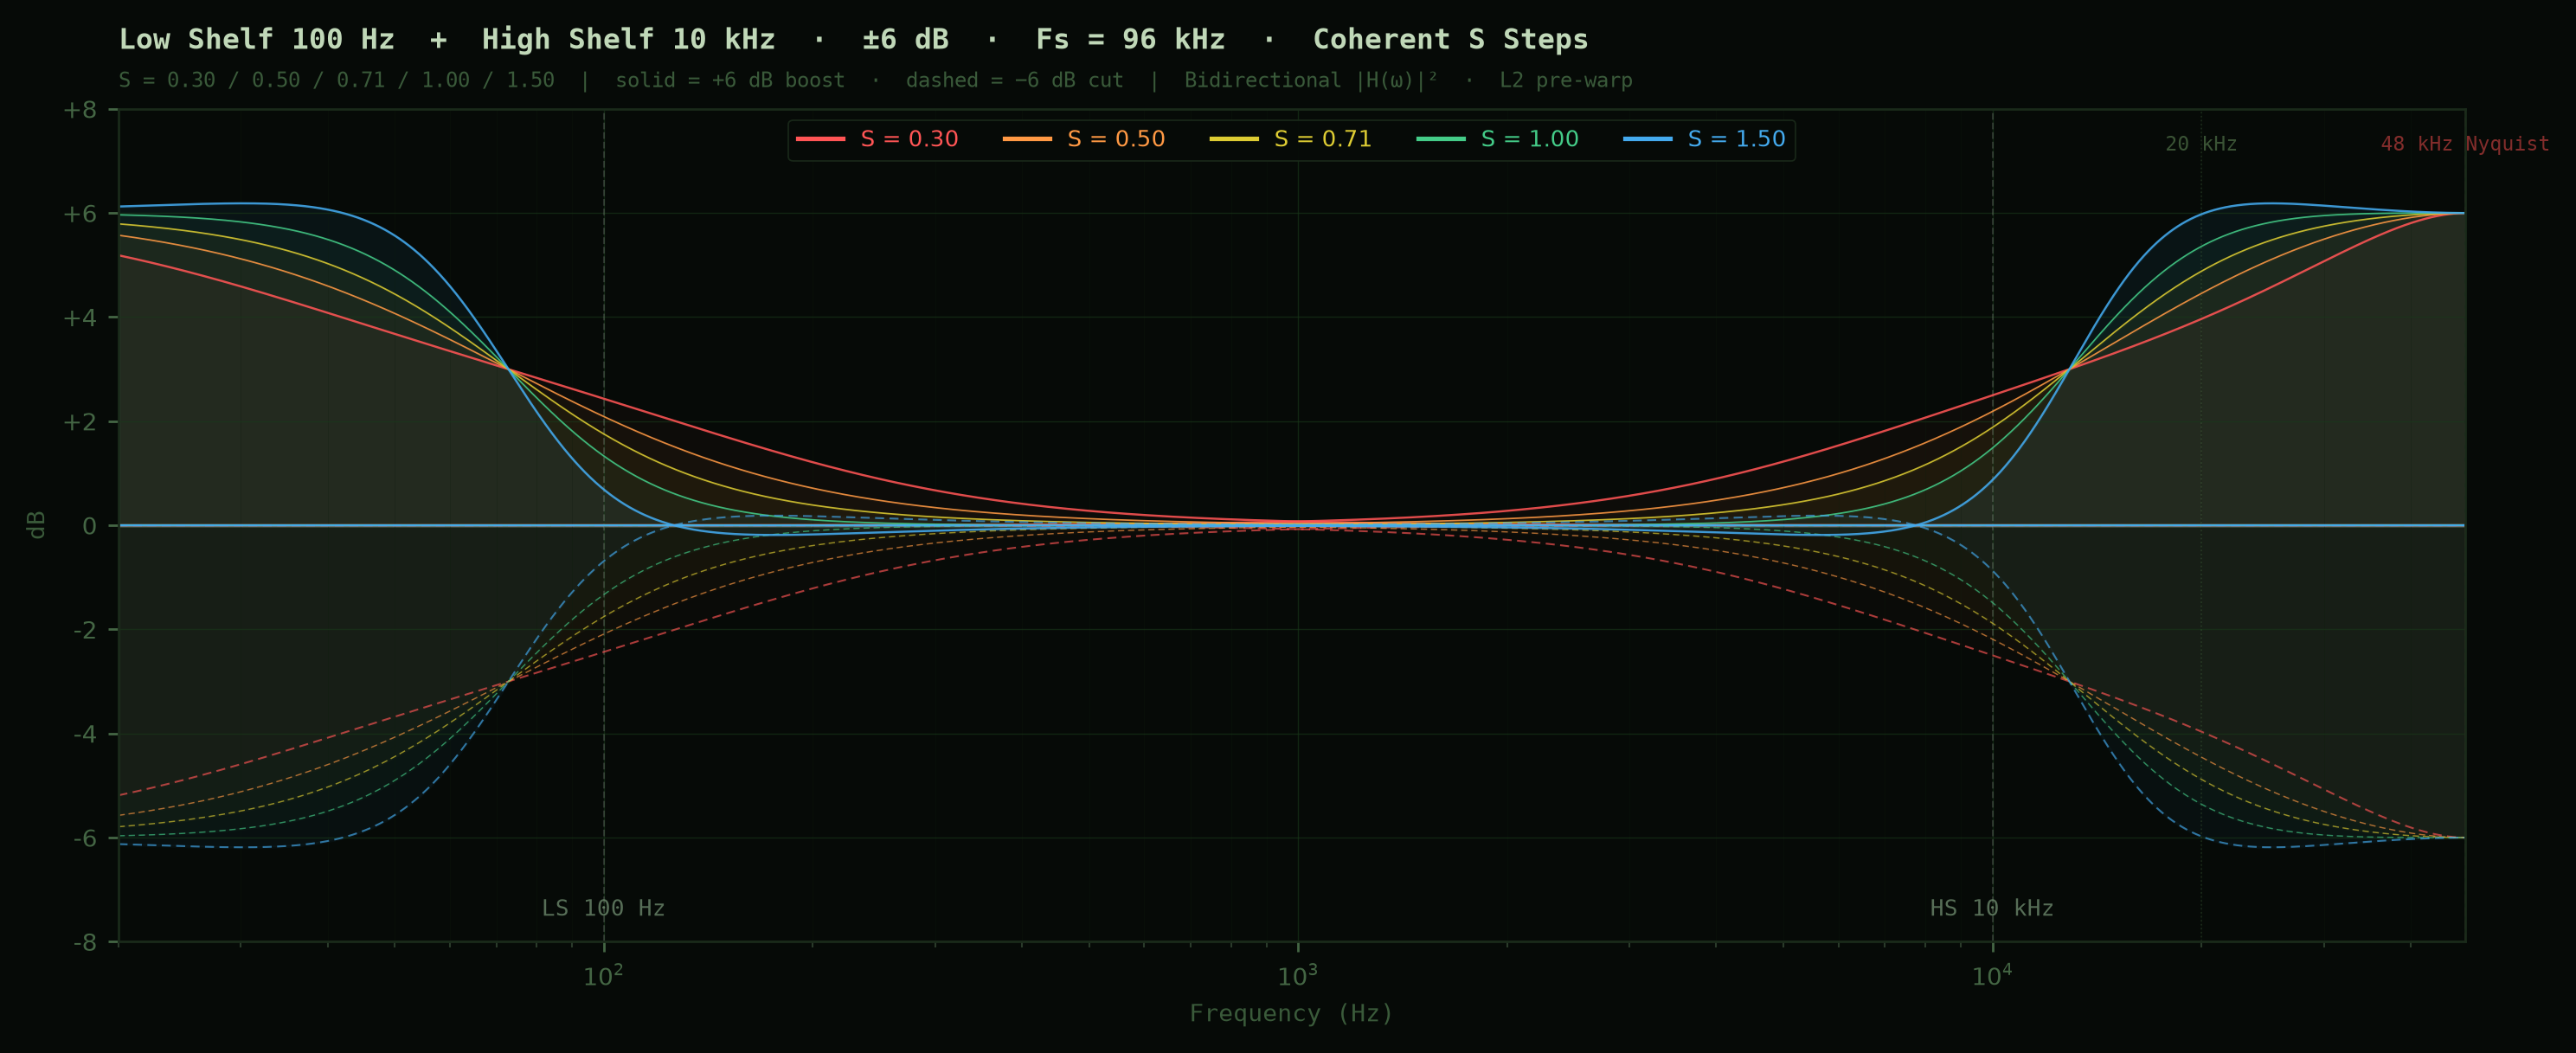
Low Cut / High Cut: Pressing m on the LS or HS band cycles Shelf → Cut12 → Cut24, and the Gain and Q cells change to read LC12, HC24 and so on. Cut12 is first-order and Cut24 is second-order Butterworth; applied forward and backward, both reach −6 dB at the corner frequency. Return to Shelf and the previous Gain and S come back as they were.
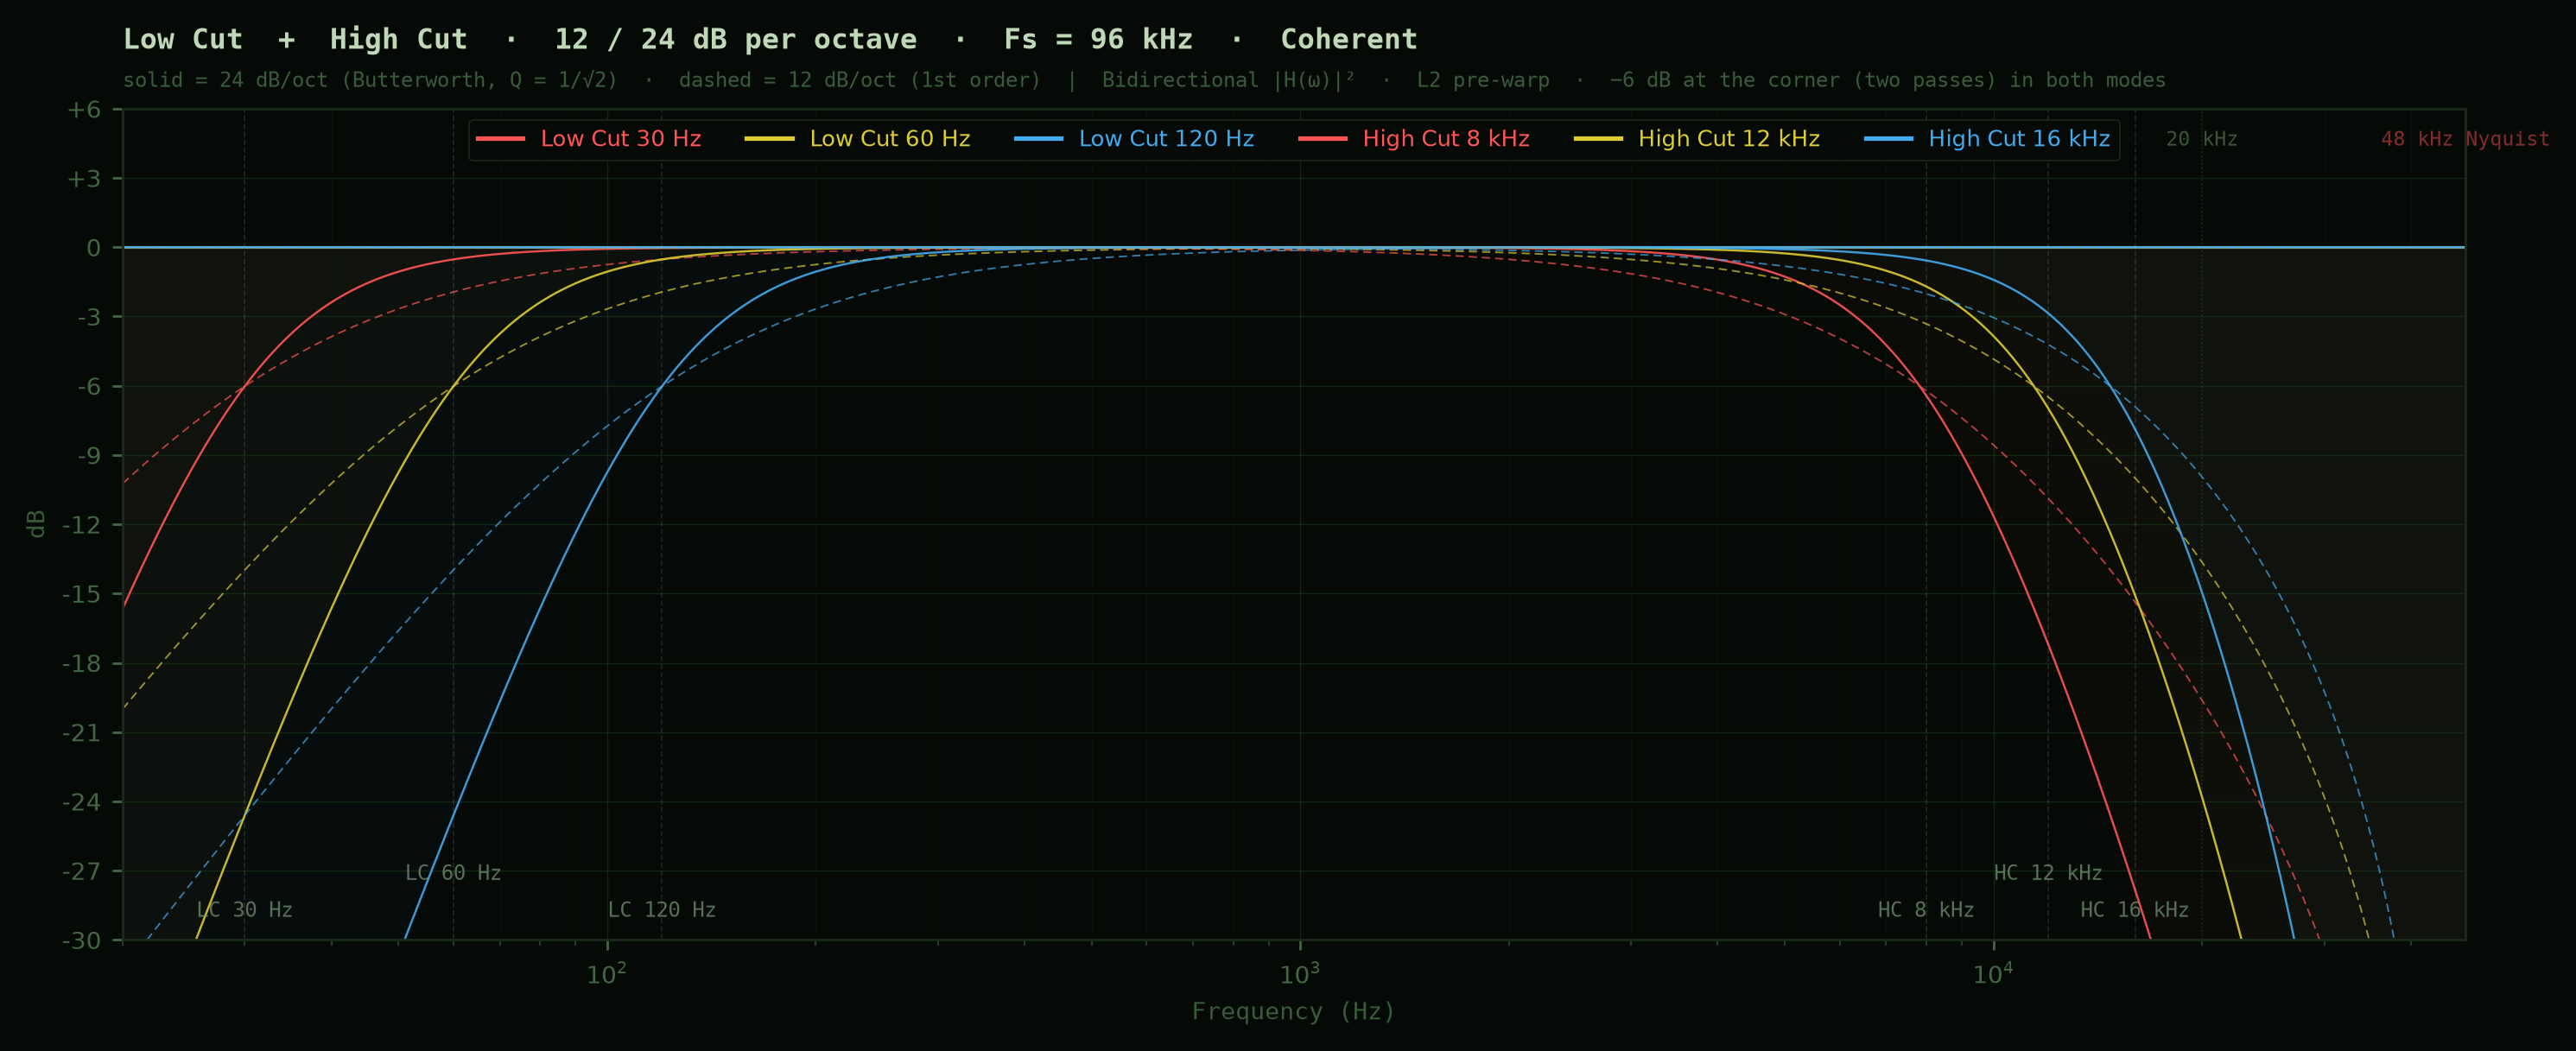
Difference from Sculpt: With the same 4-band settings the amplitude response is almost identical, but where Sculpt (minimum phase) rotates the phase around each band, Coherent does not move the phase at all. Stacking several bands in mastering leaves the time relationship between bands unchanged — that is Coherent's character.
Skipped arithmetic: A band at Gain 0 dB takes no part in the arithmetic. With every band at 0 dB, Coherent as a whole leaves the signal path. For bypass and reset, see 5.5 Bypass, reset, save.
6.3 Facet M/S
M/S EQ TUI:
Facet is a zero-phase EQ for equalizing Mid and Side independently. Forward and backward filtering means no phase rotation is introduced; it carries Coherent's transparency into the M/S domain, and DD ~106-bit + Kahan arithmetic keeps the numerical errors typical of M/S processing under control. Separate curves can be applied to the Mid and Side components, and switching to Low Cut / High Cut is likewise independent (for example, a Low Cut on the Side only). With M/S Link, Facet can in effect be used as the same zero-phase EQ as Coherent. A band at Gain 0 dB skips its DSP.
Sub (sub-octave generation)
Sub takes a chosen band of the center (Mid) component and generates the octave below it, adding the result to the center. Where an EQ boost "lifts what is already there", Sub creates a lowest octave that was not in the source and adds it. It gives substance to the low end of material whose kick or bass fundamentals do not reach far enough down.
In the TUI it is an internal element of Facet, placed on the Sub: row above the band grid. It is processed in Facet's first stage (Pre), and because the generated component is added to the center only, the stereo image does not move.
| Field | Description | Range | Default |
|---|---|---|---|
| Amount | How much of the generated component to add (%) | 0–200 | 0 |
| Lo | Lower edge of the source band (Hz) | 40–100 | 80 |
| Hi | Upper edge of the source band (Hz) | Lo+5 to min(200, Lo×2) | 160 |
Hi cannot exceed twice Lo. Keeping the source band within one octave ensures the generated sub-octave band does not overlap itself. With Lo 80 / Hi 160 Hz, for example, the generated component lies at 40–80 Hz.
At Amount 0, Sub takes no part in the signal or the arithmetic, and the Sub: row is dimmed.
Width (stereo width)
Width adjusts the S-channel gain just before M/S decoding, controlling the width of the stereo image continuously. M is fixed; Width changes the S component only. In the TUI it is an internal element of Facet on its own Width: row, dimmed at 100% (no change).
| Width | Behavior |
|---|---|
| 0 | Mono output (S = 0) |
| 100 (default) | No change |
| 200 | S doubled (maximum widening) |
Operation: A/Z steps of 10 (0, 10, 20, ... 200).
M/S Link mode (default ON)
The L key toggles relative linking of Mid and Side. [LINK] appears at the right of Facet's title row.
With Link ON, A/Z step operations apply to the corresponding Mid and Side bands at the same time. Each band's individual settings are preserved; the same change is added to both (relative link).
Switch Link OFF at any time to return to individual operation. Direct numeric entry (confirmed with Enter) applies only to the current band.
Zero-phase elliptical EQ
Setting a Low Cut on Band 1 (Low Shelf) of the Side channel suppresses the low-frequency Side component and concentrates low-end energy in the center — an elliptical EQ.
6.4 Jasper multiband compressor
Multiband compressor TUI:

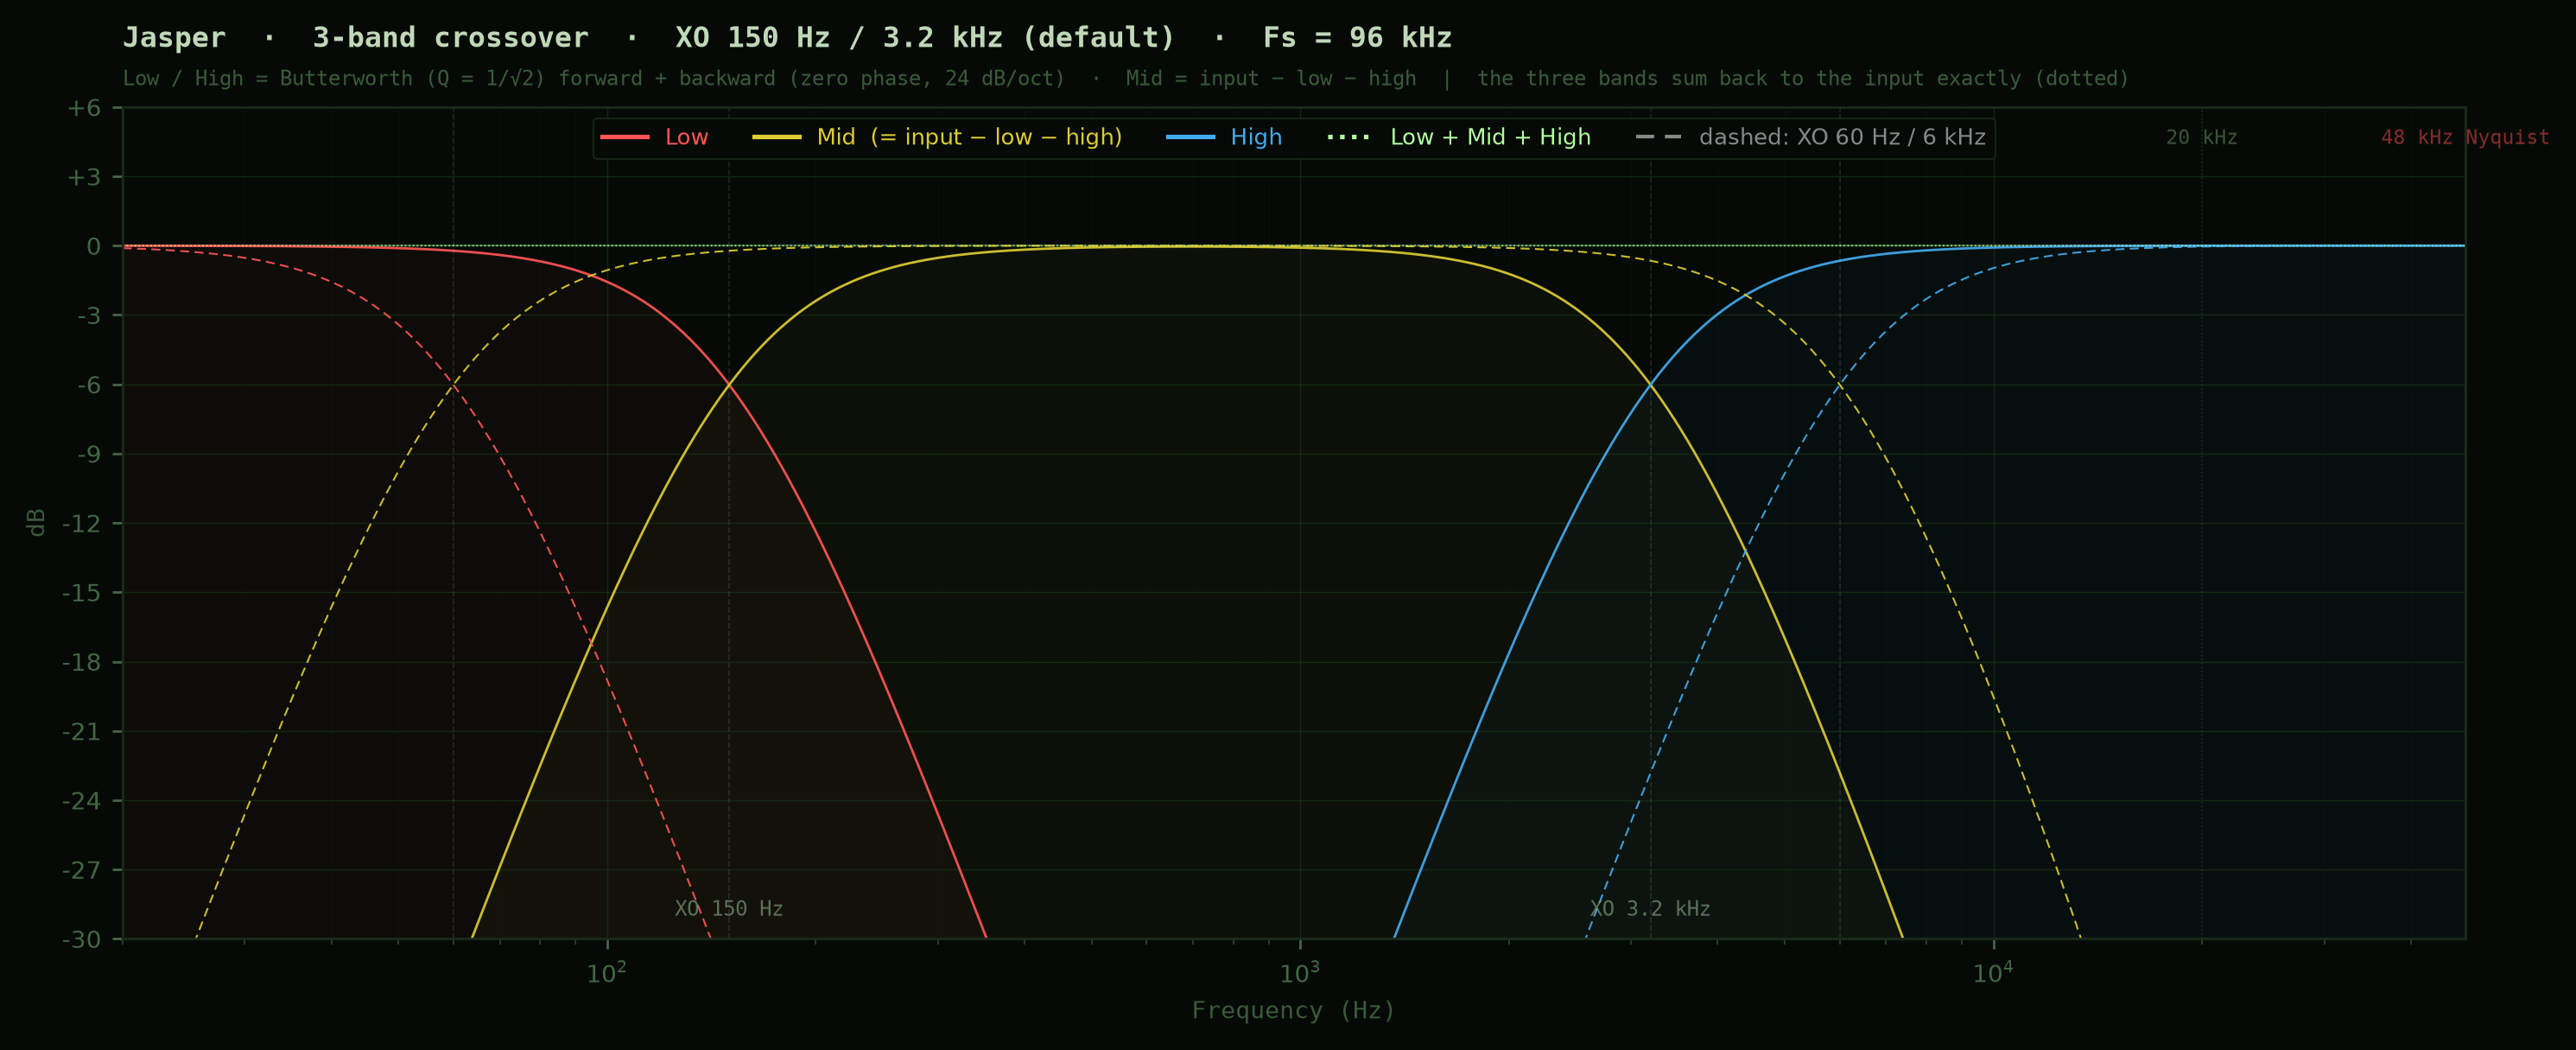
Jasper is a 3-band multiband compressor with a vacuum-tube character. A zero-phase crossover splits the signal into Low, Mid and High bands, each compressed independently; because the split uses zero-phase filters, dividing the bands does not disturb the phase. A ballistics engine inherited from Terra settles each band's level. Lo and Hi on the XO: row set the crossover frequencies, and the Low / Mid / High rows adjust the following parameters for each band individually.
| Field | Description |
|---|---|
| Thr | Threshold. A band at OFF is not compressed |
| Ratio | Compression ratio |
| Atk | Attack time |
| Rel | Release time |
| MUp | Makeup gain |
The right edge of the screen shows the GR of Low, Mid and High. With every band’s Thr at OFF and every MUp at 0 dB, Jasper itself leaves the signal path.
6.5 Sora limiter
Limiter TUI:

Sora is the 4-band ISP limiter at the end of the chain, built from an M/S × 4-band matrix soft clipper, a 4-band brickwall limiter, an M/S soft clipper, a full-band brickwall and an ISP wall. It holds inter-sample peaks with the Ceiling left at 0. The amount delegated to each stage can be set numerically — for example, either soft clipper can be set to 0. Over passages that never reach the Ceiling, and where the later stages cannot fire, the DSP of those later stages (MS Clip / FB Lim / ISP wall) is skipped. Its processing is shown as four stages: MatrixC / MB Lim / MS Clip / FB Lim. On each row, the left side holds the values you operate and the right edge shows the attenuation that stage actually applied.
| Stage | Field | Meaning | Unit | Default |
|---|---|---|---|---|
| MatrixC | Depth | How deeply the first-stage matrix soft clipper pre-shapes peaks. At 0 this stage is off | dB | 0.0 |
| MB Lim | Gain | Input gain driving the level into Sora | dB | 0.0 |
| MB Lim | HiThr | Additional threshold for the High band’s own level. Off at 0 | dB | 0.0 |
| MS Clip | Budget | Reduction delegated to the M/S clip stage | dB | 1.5 |
| FB Lim | Budget | Headroom delegated to the full-band limiter stage | dB | 0.0 |
| FB Lim | Ceil | Ceiling of the final output | dBTP | 0.0 |
| FB Lim | Link | L/R coupling in the full-band stage | % | 100 |
Five walls, four control rows

The signal passes through Walls 1–5 in order. The four control rows correspond to Walls 1–4. Wall 5, the True-Peak Wall / ISP wall, is the final protection within FB Lim. It has no separate control row and shares FB Lim’s Ceil as the final limit. HiThr adjusts Wall 2; Link adjusts Wall 4.
| Stage | Role |
|---|---|
| MatrixC | Soft-clips the waveform's peaks ahead of the limiter, relative to the material's overall maximum peak |
| MB Lim | Splits the signal into four bands and takes the required attenuation as gain reduction |
| MS Clip | Soft-clips peaks within the set range |
| FB Lim | Limits full-band peaks, with Link adjusting the coupling between channels |
| ISP wall (automatic) | Holds the remaining inter-sample peaks at or below the final ceiling |
Depth is how much MatrixC shapes first. At 0 the row is grayed out.
Gain is the total reduction applied across Sora. The higher it goes, the more attenuation the subsequent stages take on.
The required reduction is distributed automatically across the four stages. The two Budget values are operating values that set how many dB each stage is allowed to take (not meter targets); whatever exceeds them is absorbed by MB Lim as gain reduction. The two behave differently at 0.
| Operation | At 0 |
|---|---|
| MS Clip Budget | MS Clip clipping stops and the row is grayed out |
| FB Lim Budget | The final stage itself does not stop, and continues to protect the ceiling |
Ceil is the final limit after the four stages. Unless you have a specific reason, leave it at 0. Some external digital meters may flag digital clipping in red, but with Ceiling = 0 Sora's ISP is held strictly at or below 0.
Stereo Link
Link sits to the right of Ceil on the FB Lim row. It adjusts L/R coupling in the full-band limiter from 0 to 100%, in 10% steps.
| Link | Behavior |
|---|---|
| 100% (default) | Applies the same attenuation to both channels, preserving the previous behavior |
| Intermediate values, such as 50% | Adjusts coupling between shared attenuation and each channel’s own attenuation |
| 0% | Applies the attenuation needed by each channel independently |
Lowering Link reduces how much the quieter channel is pulled down by the louder one. Depending on the material, the stereo balance may also move more, so compare center stability with channel independence by ear. This control changes FB Lim coupling; it does not change the coupling of MB Lim or the M/S clippers. The final Ceil protection is retained at every value.
Use a / z to move one step, or type a number and press Enter. Older presets without Link use 100%. z0app preserves the setting through history, track switching and Export.
Auto Gain (target loudness)
Sora's title row shows Loudness Manual / [Auto] and the target LKFS. In Auto, Sora adjusts its Gain automatically so that the output reaches the target LKFS.
| Action | Key |
|---|---|
| Switch Auto / Manual | Space on the Loudness field (a for Auto, z for Manual) |
| Change the target LKFS | a / z on the target value (0.1 dB steps), or type a value and press Enter. Default −14.0 |
Auto takes effect once a fresh LKFS measurement is settled (the time row shows auto: waiting for fresh LKFS). It is unavailable while Dimmer, Gain Match or Mono preview is engaged. Returning to Manual leaves Sora's settings as they are.
Actual work per stage
The MatrixC / MB Lim / MS Clip / FB Lim figures at the right edge are the attenuation each stage actually applied to the current sound. When a stage is idle it shows ---; otherwise a negative value in 0.1 dB steps, turning green as a warning when any stage reaches 2.5 dB or more.
The four figures describe each stage's work on the sound at the same moment, so you can compare, row by row, where the load is concentrating. The sign denotes attenuation: -1.5 dB, for instance, means that stage lowered the level by 1.5 dB.
Crossover points and per-band GR
On the MB Lim row, to the right of Gain, sit the two crossover points Lo / Hi (default 200 Hz / 4 kHz). The points are kept within 80 Hz on the low side and 10 kHz on the high side, and the spacing between the two is preserved. Frequencies can be typed directly with k, as in 4k.
HiThr, to the right of Hi on the MB Lim row, sets an additional threshold for the High band alone, above XO Hi. Its range is −30 to 0 dB in 0.5 dB steps. At 0, the default and the value used by older presets without this field, the function is off and dimmed. Negative values add attenuation according to the High band’s own level. It is neither a fixed EQ nor a control that couples High reduction to the lower bands’ gain reduction. Deeper settings can produce stronger or more sustained high-frequency attenuation, so adjust by ear for the material.
Low / Mid / High on the row directly below MB Lim shows per-band GR, with the two central bands of the internal four combined as Mid.
| Row | Contents | Operation |
|---|---|---|
Lo / Hi on the MB Lim row | Low-side / high-side crossover points | Editable |
| The row below | Per-band GR for Low / Mid / High | Read-only |
Keys
Select a field with the arrow keys and operate it with the following keys.
| Key | Action |
|---|---|
↑ ↓ ← → | Move between fields |
a | Raise the selected value one step |
z | Lower the selected value one step |
Digits · . · - · k | Type the selected value directly |
Enter | Confirm the typed value |
Gain moves in 0.5 dB steps from 0 to 20 dB, and Ceil in 0.1 dB steps from −10 to +6 dBTP. Link moves from 0 to 100% in 10% steps. Depth and the two Budget fields choose from the following candidates.
| Field | Selectable values (dB) |
|---|---|
| Depth | 0 / 0.5 / 0.667 / 1.0 / 1.5 / 2.0 / 2.5 / 3.0 / 3.5 / 4.0 |
| MS Clip Budget / FB Lim Budget | 0 / 0.5 / 0.667 / 1.0 / 1.5 / 2.0 / 2.5 / 3.0 / 4.0 |
Direct entry — typing digits and confirming with Enter — is also supported. Candidate-list fields are rounded to the nearest value, and Gain, Ceil and the crossover points are kept within their valid ranges.
6.6 Veil de-esser
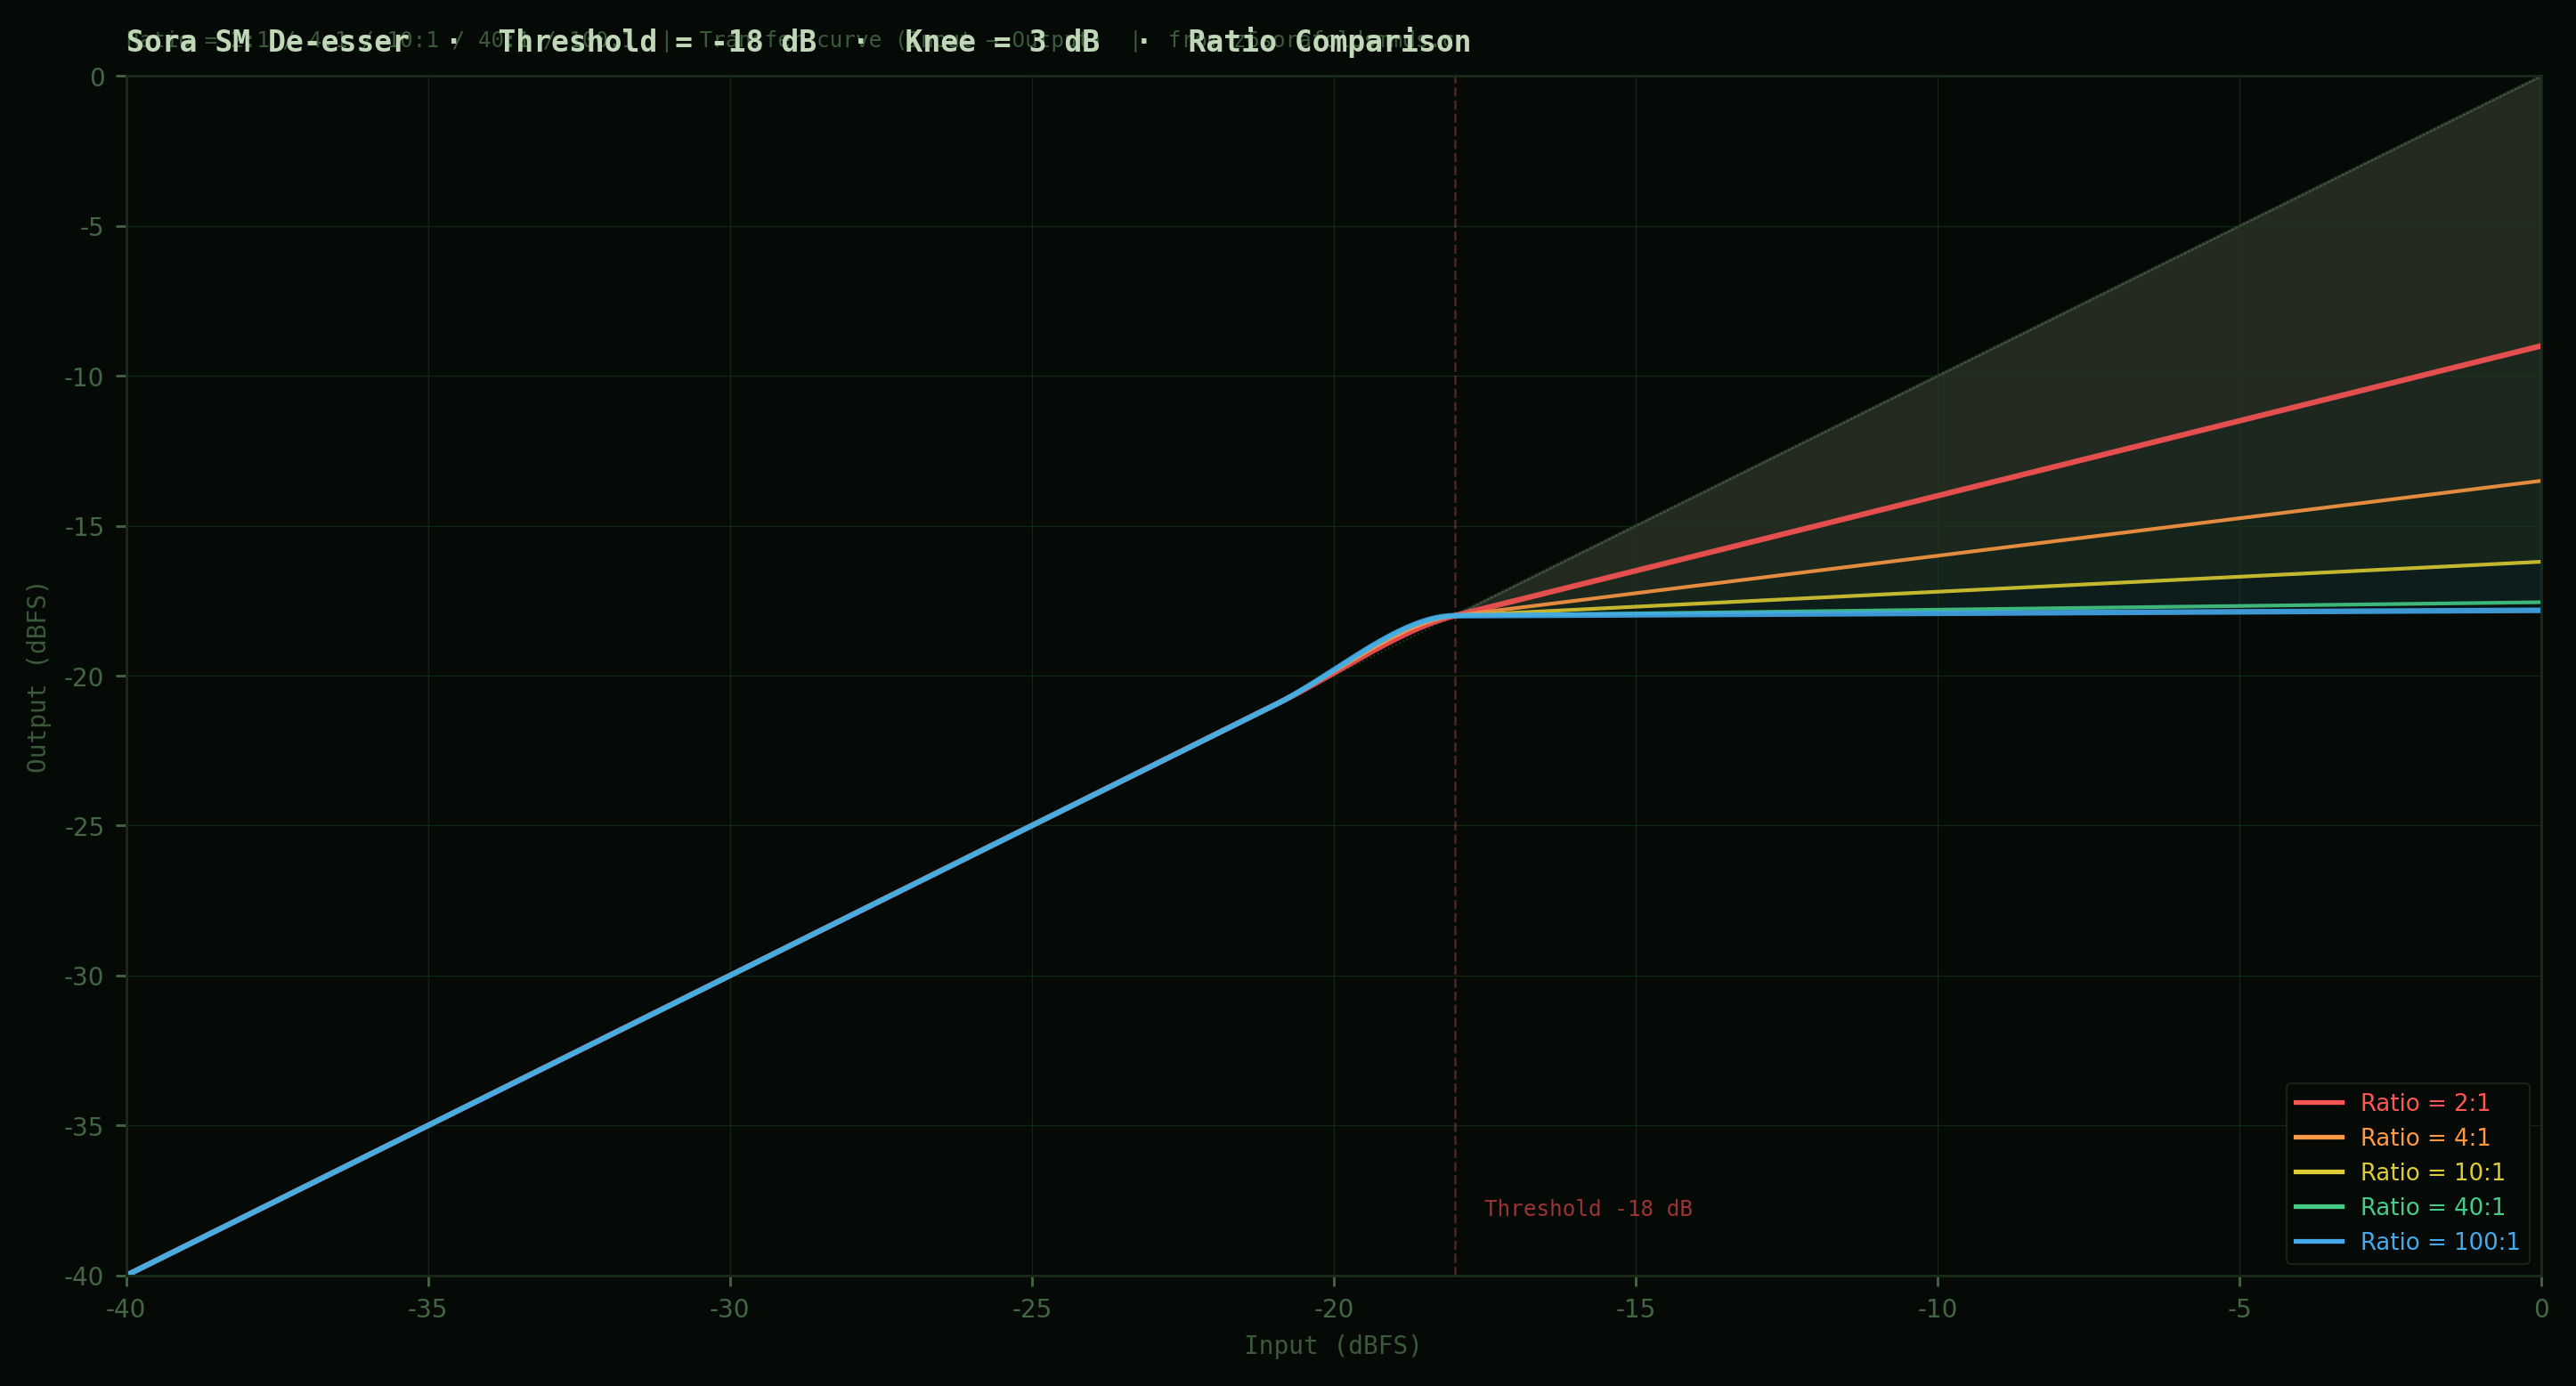
Veil is an M/S dynamic de-esser. Center and Side de-essing are controlled independently, in a transparent design that never lets you feel the process working.
De-esser TUI parameters:
Displayed on two rows: threshold and knee on the first, band and release on the second.
| Row | Field | Description | Default |
|---|---|---|---|
| Row 1 | ThrM | Mid channel threshold (dB) | 0 |
| Row 1 | ThrS | Side channel threshold (dB) | 0 |
| Row 1 | Knee | Knee width (dB) | 3.0 |
| Row 2 | Lo | Sidechain high-pass cutoff (Hz) | 4000 |
| Row 2 | Hi | Sidechain low-pass cutoff (Hz) | 7000 |
| Row 2 | Rel | Release | Fast |
With both the Mid and Side thresholds at zero, the whole engine is bypassed and the input passes through unchanged. With only one of them at zero, no detection is performed for that channel. Passages that never reach the threshold pass through with no arithmetic at all, band splitting included. Both default to zero, so Veil does not touch the signal until a threshold is lowered.
The L key links the Mid and Side thresholds ([LINK] on the title row). For example, de-essing the Mid only for a lead vocal, or the Side only for doubled backing vocals, keeps the effect on other instruments to a minimum.
The meter column at the right edge shows three figures.
| Meter | Contents |
|---|---|
| Max | The deepest GR over the whole track |
| GR | GR in the effective band (RMS over roughly the last 200 ms) |
| Pk | The deepest momentary GR in the most recent window |
Listen monitor: With the cursor on Veil's title row, pressing m extracts and auditions only the component the de-esser is actually removing (Listen on the title row turns green). It is there so that you can judge by ear, precisely, whether the threshold is "biting" where it should.
6.7 Terra compressor
Compressor TUI:

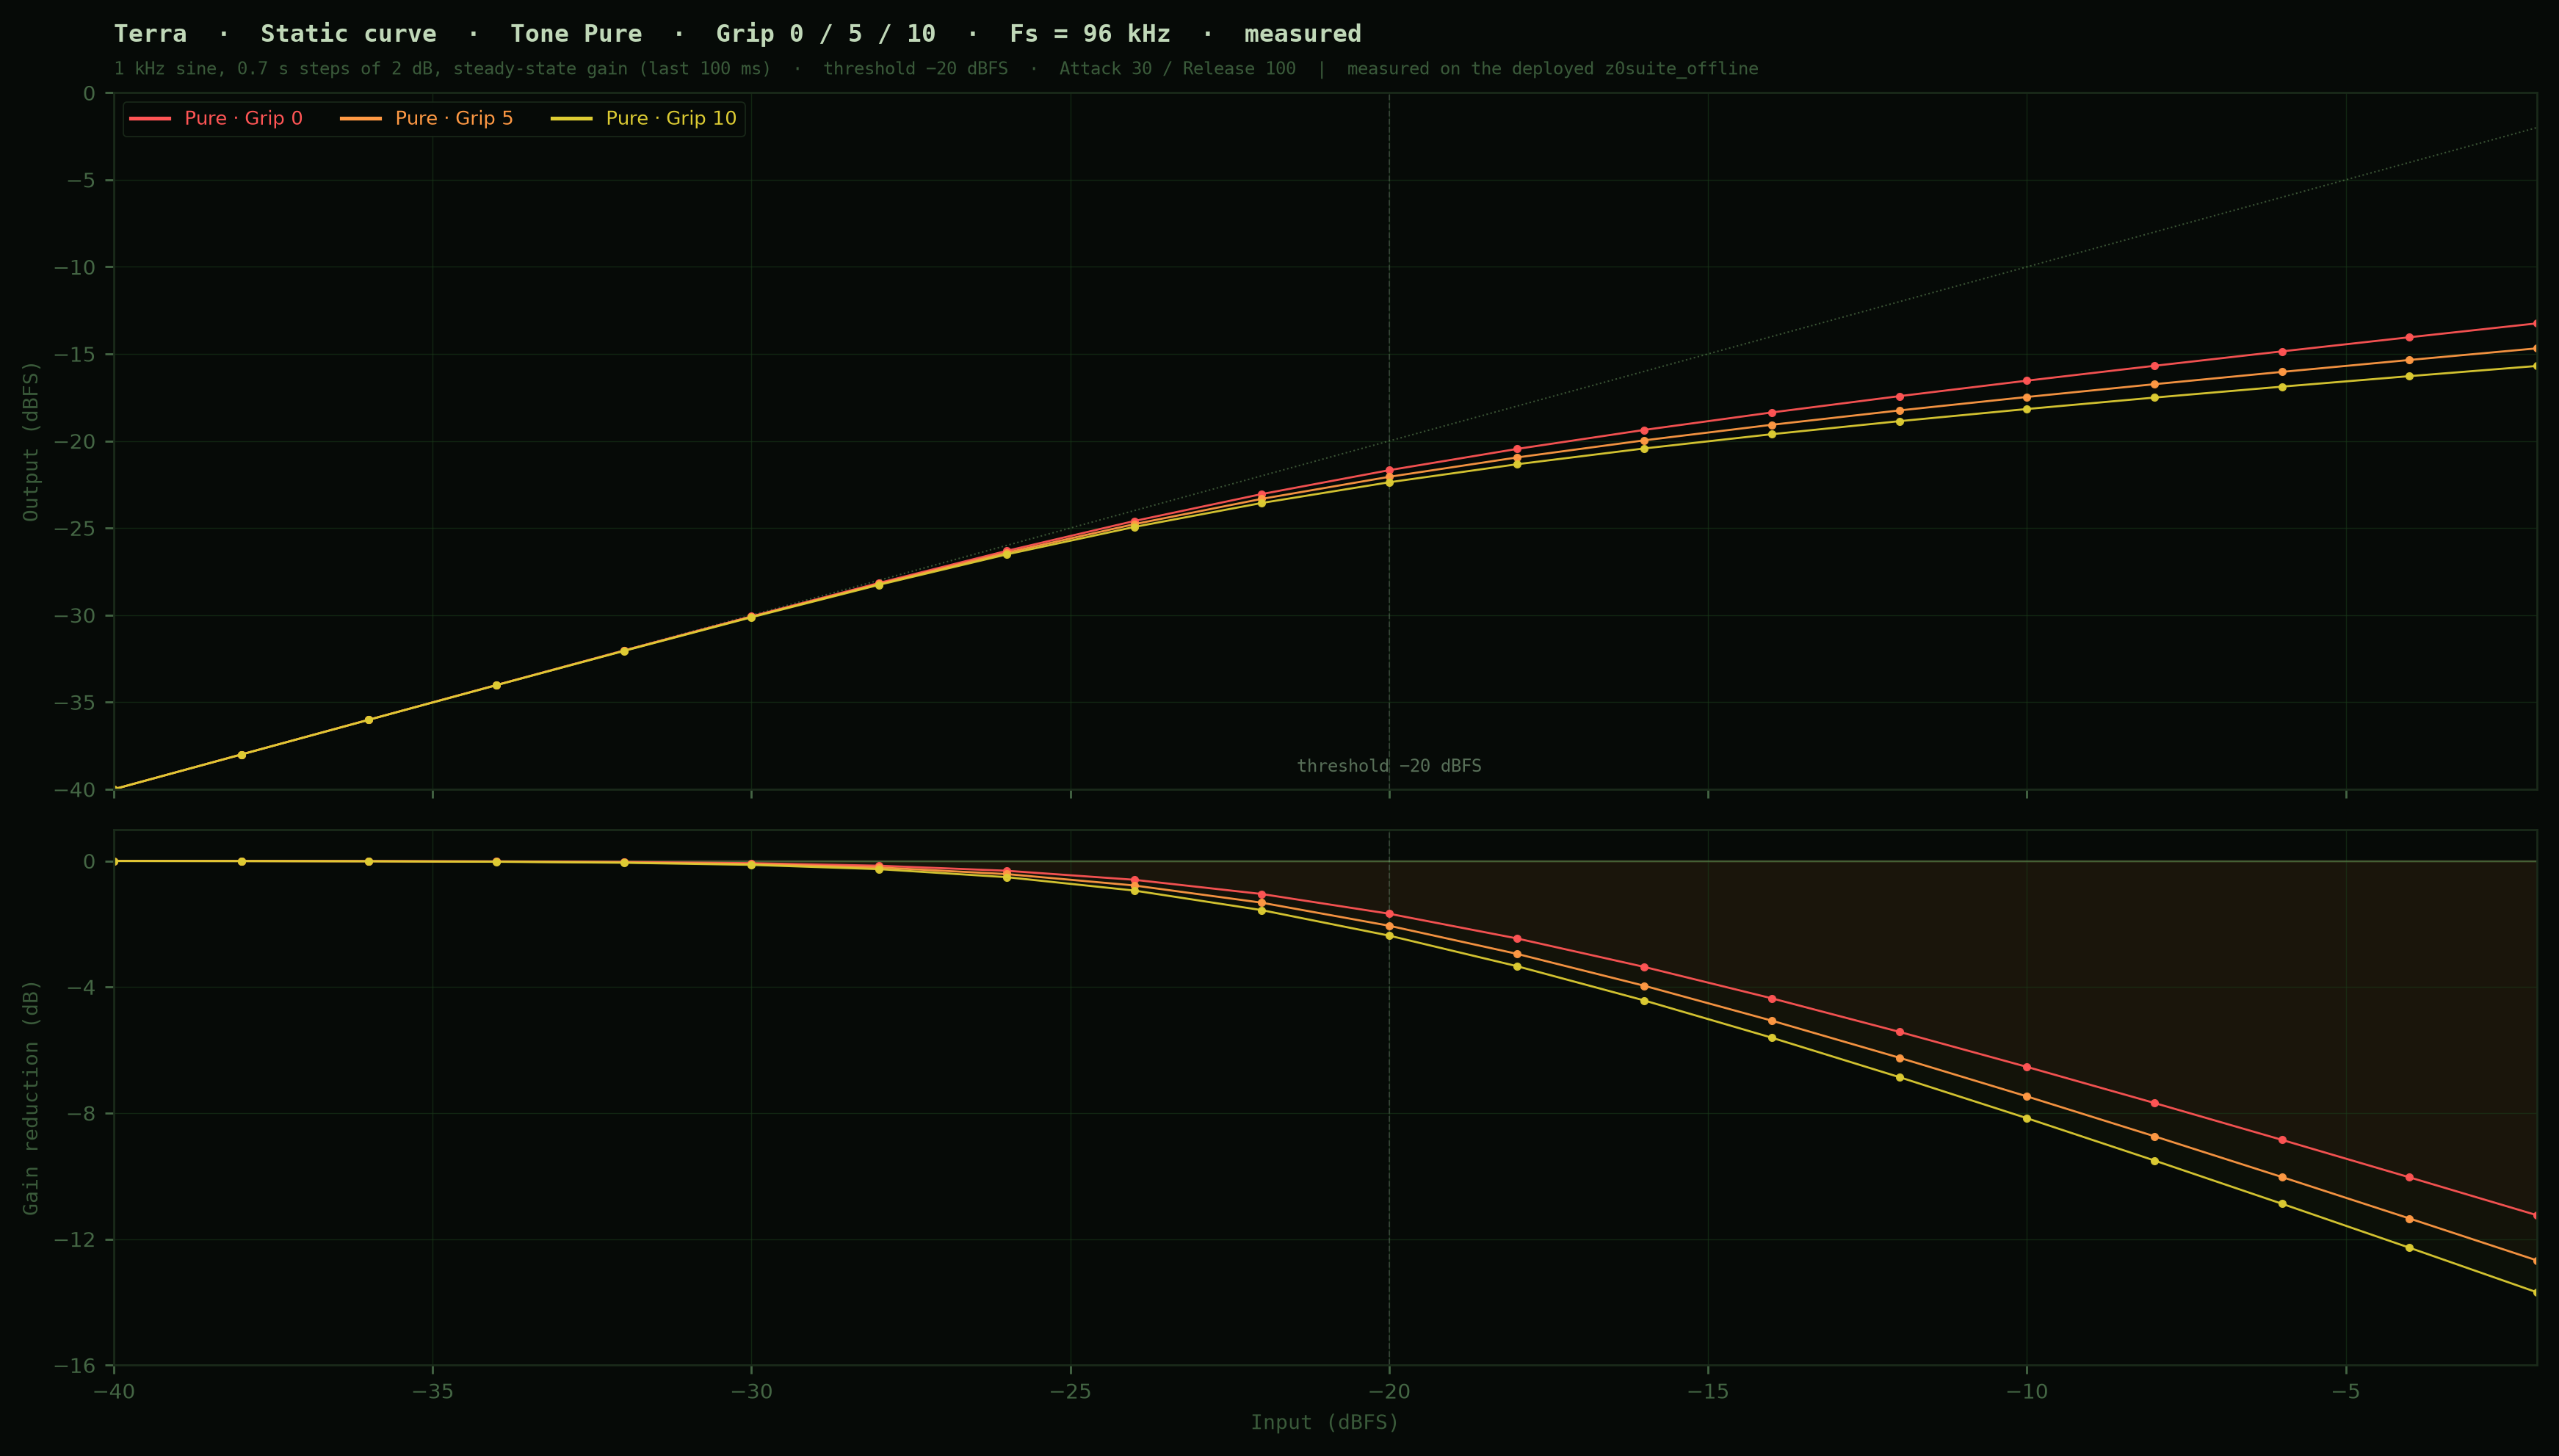
Terra is a single-band VCA-style compressor. Tone selects among four characters — Transparent / Pure / Glue / Pump — changing the very quality of the compression. Transparent levels the material while leaving no trace of a compressor; Pure adds density with a wide soft knee and low ratio, moving the work slightly forward; Glue binds the whole into one; Pump leans toward house and techno, actively creating groove and pumping.
Attack and Release are displayed and saved as fixed steps in milliseconds; the defaults are Attack 30 ms / Release 100 ms. Ratio is set first by the Tone, and Grip decides how far into that range the compression goes. The same Grip 5 gives a different ratio under a different Tone.
Terra is displayed on four rows.
| Row | Fields |
|---|---|
| Row 1 | Thr / Grip |
| Row 2 | Atk / Rel / Tone |
| Row 3 | Link / MUp / Mix |
| Row 4 | SC / Lo / Hi |
| Field | Description | Values |
|---|---|---|
| Thr | Threshold | −36.0 to +6.0 dB |
| Grip | Sets the depth of the compression within the ratio the Tone defines | 0–10 |
| Atk | Attack time | 0.1 / 0.5 / 1.3 / 3.5 / 10 / 20 / 30 ms |
| Rel | Release time | 100 / 140 / 190 / 250 / 340 / 420 ms |
| Tone | Character. Sets the base ratio and Soft Knee | Transparent / Pure / Glue / Pump |
| Link | Display only. The value is fixed by the Tone | — |
| MUp | Makeup gain | 0.0–12.0 dB |
| Mix | Parallel blend | 0–100 % |
| SC | Sidechain On/Off | Off / On |
| Lo · Hi | Lower and upper edges of the sidechain detection band | 20 / 30 / 40 / 50 / 60 / 80 / 100 / 120 / 160 / 180 / 250 / 350 / 500 / 800 / 1200 Hz |
With Tone at Transparent, Grip is disabled, since Transparent sets its own ratio. The right edge of the screen shows Max (the deepest GR over the whole track) and GR.
Sidechain (SC)
Setting SC to On narrows the detection signal the compressor sees to the band between Lo and Hi (default 30 Hz / 180 Hz). The lower edge is a 12 dB/oct high-pass and the upper edge a 12 dB/oct low-pass; together they act as a single band-pass.
Only the detection changes; the sound itself does not. Because the filter sits only in the detection path, the full-band signal passes to the output unchanged. All that SC On changes is which band of the music drives the compressor.
SC On therefore makes a low-keyed trigger that ducks the whole mix the instant the kick or bass arrives. Sound that exists only outside the chosen band produces no gain reduction.
Lo cannot exceed Hi, and Hi cannot fall below Lo. An operation that would cross the other edge is ignored, leaving that edge where it is.
With SC at Off, the three fields SC / Lo / Hi are grayed out.
SC monitor (m key)
With the cursor on Terra's header or body, pressing m lets you hear the very signal the detector is seeing (after the high-pass and low-pass). Mon SC on Terra's title row turns green.
It is there so that you can confirm by ear that Lo / Hi are capturing the band you intended. You hear the raw filter output — nothing from the envelope, the curve, the gain reduction, the makeup or Mix.
It can be engaged only while Terra is On, SC is On, and neither tool bypass nor master bypass is active. When these conditions no longer hold, the request is cleared. It is not saved in the preset and does not affect export.
Parameter reference (step tables)
The step values selected with the A/Z keys are designed for the mastering room. Every step value can be overwritten by typing a number.

7.1 Frequency table
21 steps based on the E12/E24 series. Interleaved so that adjacent bands never overlap, they cover the whole range from 10 Hz to 33 kHz. PK1–PK4 are the same in 4-band and 6-band modes. The k suffix can be used when typing frequencies (e.g. 1.5k = 1500 Hz).
Bold values in the tables are each band's default frequency at launch.
| Band | Range |
|---|---|
| PK 1 | 10, 12, 15, 18, 22, 27, 33, 39, 47, 56, 68, 82, 100, 120, 150, 180, 220, 270, 330, 390, 470 Hz |
| PK 2 | 20, 24, 30, 36, 43, 51, 62, 75, 91, 110, 130, 160, 200, 240, 300, 360, 430, 560, 680, 820, 1000 Hz |
| PK 3 | 510, 620, 750, 910, 1.1k, 1.3k, 1.6k, 2k, 2.4k, 3k, 3.6k, 4.3k, 5.1k, 6.2k, 7.5k, 9.1k, 11k, 13k, 16k, 20k, 24k Hz |
| PK 4 | 680, 820, 1k, 1.2k, 1.5k, 1.8k, 2.2k, 2.7k, 3.3k, 3.9k, 4.7k, 5.6k, 6.8k, 8.2k, 10k, 12k, 15k, 18k, 22k, 27k, 33k Hz |
In 6-band mode (Coherent / Facet), in addition to PK 1–4:
| Band | Range |
|---|---|
| LS | 15, 18, 22, 27, 33, 39, 47, 56, 68, 82, 100, 120, 150, 180, 220, 270, 330, 390, 470, 560, 680 Hz |
| HS | 470, 560, 680, 820, 1k, 1.2k, 1.5k, 1.8k, 2.2k, 2.7k, 3.3k, 3.9k, 4.7k, 5.6k, 6.8k, 8.2k, 10k, 12k, 15k, 18k, 22k Hz |
LS is the one exception. Its default at launch is 80 Hz, which is not a value in the step table. The nearest table entry is 82 Hz: A moves one step up to 100 Hz, and Z one step down to 68 Hz (82 Hz itself is never passed through by the A/Z keys).
7.2 Gain table
23 gain steps:
-10 -8 -6 -5 -4 -3 -2.5 -2 -1.5 -1 -0.5 0 +0.5 +1 +1.5 +2 +2.5 +3 +4 +5 +6 +8 +10 dB0.5 dB steps around 0 dB, coarser toward the extremes. The default at launch is 0 dB (flat).
Values outside the table (e.g. +1.3 dB) can be typed directly.
7.3 Q/S table
The actual curves for P1–P6 and each S step are shown in 6.2 Coherent zero-phase EQ.
Coherent peak bandwidth — 6 positions:
| Display | Character |
|---|---|
| P1 | Widest |
| P2 | Wide |
| P3 | Moderately wide |
| P4 | Medium |
| P5 | Narrow |
| P6 | Narrowest |
| CUSTOM | Shown while a typed numeric Q is in use |
The Q characteristic follows Coherent's own design. Pressing A/Z while CUSTOM is shown moves to P1–P6 from the position nearest the current sound.
S (shelf slope) — 5 steps:
| S | Meaning |
|---|---|
| 0.30 | Very gentle slope |
| 0.50 | Gentle slope |
| 0.71 | Standard (Butterworth slope) |
| 1.00 | Steep slope |
| 1.50 | Very steep slope |
Preset file format
Presets are saved as plain text (.txt).
Line format: key: frequency(Hz) gain(dB) Q
The preset history accumulates in one file as blocks separated by ---:
---
# z0 preset --2026-03-14 14:30:45
# path: /path/to/file.wav
input_gain: 0.5
band1: 100.0 -2.0 1.41
...
---
# z0 preset --2026-03-14 15:10:22
# path: /path/to/file.wav
input_gain: 0.0
band1: 100.0 -1.0 1.41
...Offline export (z0app)
z0app's export invokes an offline binary internally, but nothing of this is visible to you: files are written out exactly as z0app is set, with no further steps.
ZCON
z0Suite's internal arithmetic and the intermediate master passed to ZCON are Float64 (4.8 Export). The step that brings this down to a delivery format for CD or streaming — sample-rate conversion and the final bit depth — is handled by ZCON, z0's pure sample-rate converter. The delivery file is completed inside z0, with no external converter.
ZCON is a delivery step used from z0app's Export window. It plays no part in playback or in the z0Suite chain. z0app performs the final delivery-format decision once, from the Float64 intermediate result.
10.1 Two types
The sample-rate conversion filter comes in two types of differing character. Both are linear-phase and computed in Float64, and their coefficients are frozen bit for bit. The same input yields the same output, whenever it is run. In the Export window they are chosen under "Conversion" as Short FIR and Steep FIR (in v0.16.130 the former "Basic" was renamed Short FIR and "Reference" Steep FIR; the character of the two types is unchanged).
Steep FIR is designed from a single Kaiser window; Short FIR fits a double Kaiser window in the amplitude domain.
96 → 44.1 kHz
| Type | Passband | Alias rejection | Response length |
|---|---|---|---|
| Steep FIR | −0.01 dB @ 20.381 kHz | −206.6 dBFS | 6.56 ms |
| Short FIR | −0.01 dB @ 20.467 kHz | −45.4 dBFS | 3.46 ms |
96 → 48 kHz
| Type | Passband | Alias rejection | Response length |
|---|---|---|---|
| Steep FIR | −0.01 dB @ 20.771 kHz | −208.6 dBFS | 3.44 ms |
| Short FIR | −0.01 dB @ 22.280 kHz | −43.7 dBFS | 3.19 ms |
THD+N is −238 dB or below for either type at either rate (measured −238.5 to −239.7 dB; the same at both −0.1 dBFS and −60 dBFS).
Steep FIR pushes aliasing down to near the measurement floor. It passes flat to 20 kHz and cuts steeply above. Suited to deliveries where numerical transparency comes first.
Short FIR gives priority to the length of the impulse response. The ringing that extends before and after the filter settles in roughly half of Steep FIR's time. In exchange, alias rejection stays around −45 dB. That is a contractual design value, chosen for the short response (SARACON type). Short FIR is the default. The type you choose is remembered for the next Export.
As is the fate of any linear-phase filter, roughly half of the impulse response's energy appears ahead of the input (measured 49.8–50.0%). The difference in response length is exactly the difference in how far that pre-response extends.
Which to choose is a matter of material and taste. For conversion among 44.1 / 48 / 88.2 / 96 / 176.4 / 192 kHz, select Short FIR or Steep FIR under "Conversion" in the Export window. Short FIR is available for upsampling from 44.1 → 96 kHz and 48 → 96 kHz, using upsampling coefficients from the same design family as Short FIR; z0Suite's 96 kHz working rate (4.11) uses the same coefficients. If Short FIR is selected for any other upsampling, Steep FIR is used and recorded in the internal conversion record.
10.2 Gain and dither
After sample-rate conversion, processing runs in the order user gain → True Peak measurement → dither + quantization. Seen from z0Suite's limiter, it is the stage that follows.
| Item | Specification |
|---|---|
| User gain (Ceiling) | 0.0 to −6.0 dB in 0.1 dB steps. Default −0.2 dB (applied only to 16 / 24-bit delivery; not applied to Float64 output) |
| Dither | TPDF, 2 LSB p-p |
| Random seed | Fixed (0xD17E5EED00000001) |
| True Peak measurement | 4× oversampling |
| Output | WAV 16-bit / 24-bit PCM |
Gain is provided because sample-rate conversion can raise peaks slightly. Material pushed right up to 0 dBTP before conversion may show inter-sample peaks above the ceiling afterwards. The reduction is set in 0.1 dB steps.
The default of −0.2 dB exists to absorb that rise. For example, set z0Suite's target loudness 0.2 dB higher (−13.8 LKFS), then let ZCON apply the default −0.2 dB for a total of −14.0 LKFS.
The dither's random seed is fixed. The same input with the same settings always produces a bit-identical delivery file. A remake matches its predecessor, so a delivery replacement can never suffer the accident of "the sound should be the same but the file is different".
10.3 How to use
- Lock the tracks to export and open "File" → "Export..." (
Cmd+E) in z0app. - Choose the tracks under "Tracks", and the destination with "Choose..." under "Destination".
- Enter
_441or another value under "File name" → "Filename suffix". It is inserted before the extension and remembered for the next Export. "Default" restores_z0. - Choosing "24 bit" or "16 bit" under "Bit depth" enables ZCON delivery. "Float64" writes the 64-bit float master and
eq_sheet.txt. - Under "Sample rate", choose "Same as master" or 44.1 / 48 / 88.2 / 96 / 176.4 / 192 kHz. If the target differs from the source, choose "Short FIR" or "Steep FIR" under "Conversion" (the default is Short FIR).
- Set 0.0 to −6.0 dB in 0.1 dB steps with the "−" / "+" under "Ceiling" (default −0.2 dB), and press "Export".
When 16 or 24 bit is selected, the Float64 intermediate master and .z0conv.json are used for conversion verification internally; only the delivery WAV is written to the destination. "Same as master" performs no sample-rate conversion — only gain, dither and the final bit depth. Use it, for example, to deliver 24-bit at 96 kHz.
Each time z0app runs ZCON, the SHA256 of the executable and of the filter coefficients is checked internally. If even one byte differs, the delivery file is not created and the reason is shown when Export completes. No delivery file is ever produced by anything other than the frozen coefficients.
10.4 Conversion verification record
ZCON generates .z0conv.json during conversion to verify the result. z0app removes this internal file after verification; it is not placed in the delivery destination. Its main fields are listed below.
| Field | Contents |
|---|---|
input_sha256 / output_sha256 | SHA256 of the input and output files (as measured) |
input_sample_rate / output_sample_rate | Sample rates before and after conversion |
profile_id | The type and rate pair used (96 → 44.1 kHz: shortir-v1-96-441 / steep-v1-96-441; 96 → 48 kHz: shortir-48 / reference-48; Short FIR 44.1 / 48 → 96 kHz: shortir-v1-441-96 / shortir-v1-48-96, etc. reference-… denotes Steep FIR) |
coefficient_sha256 | SHA256 of the filter coefficients |
user_gain_db / word_length_bits | Gain and bit depth |
dither / seed | Dither method and random seed |
true_peak_4x / true_peak_dbtp | True Peak measured with 4× oversampling |
saturate_count | Number of samples that hit the ceiling on quantization |
chain | The order of the steps applied and each stage's parameters |
verification | Results of the WAV structure, afinfo and SHA256 checks |
If the internal saturate_count is nonzero, the delivery file contains clipping. If checking the delivered WAV reveals clipping, lower Ceiling and export again.
10.5 Input conditions and limits
| Condition | Contents |
|---|---|
| Input format | Stereo, 64-bit float (IEEE 754 double precision) WAV. When 16 / 24-bit delivery is chosen for a mono track, z0app duplicates it to stereo 64-bit float (L = R) before the master is rendered and handed to ZCON, so both the master and the delivery file are stereo. Three or more channels are out of scope |
| Input sample rate | 44.1 / 48 / 88.2 / 96 / 176.4 / 192 kHz |
| File size | Under 4 GB (RF64 not supported) |
| Output rate | 44.1 / 48 / 88.2 / 96 / 176.4 / 192 kHz / same as input |
| Output bit depth | 16-bit / 24-bit |
The input conditions are met directly by a z0Suite export. Choosing 16-bit or 24-bit in z0app's Export panel hands the 64-bit float master, written first, to ZCON within the same Export run.
Because the intermediate F64 output is limited to 4 GB, output at 176.4 kHz is limited to about 25 minutes per track and output at 192 kHz to about 23 minutes. RF64 is not supported.
Hog Mode
Hog Mode is a Core Audio feature that gives a single process exclusive use of an audio device.
z0 uses it, when the conditions are right, to take exclusive possession of the audio device in one process. The mechanism is intended to prevent interference from other applications in the playback path, but its actual behavior depends on the device, the driver and the state of the OS, and it does not guarantee that other system sounds will always be diverted to the built-in speakers.
When z0 quits or playback stops, audio returns to normal automatically.
Automatic sample-rate switching
z0 detects a mismatch between the file's sample rate and the audio device's sample rate and switches the device automatically. Playback starts only after the switch is confirmed.
The !SRC warning in z0app:
If the file's sample rate is not among the device's native sample rates (read automatically from the device), a red !SRC appears in the track list. In this case macOS Core Audio performs sample-rate conversion (SRC), which may affect sound quality. The native rates reported depend on what the device's driver or firmware returns, and may differ from the hardware's actual capabilities.
This !SRC warns of conversion that happens on the macOS side during playback. It is distinct from the sample-rate conversion z0 itself performs for delivery (10. ZCON).
Workflow examples
A basic mastering session
Mix in your DAW and finish in z0. When bouncing from the DAW, hard-bypass every plug-in on the master fader and export at the session's own precision — 32-bit as 32-bit, 64-bit as 64-bit.
- Launch z0app
Cmd+Nto create a new session- Add your mix masters with
Cmd+Oor by drag and drop - Select a tool with
←→(e.g. z0Suite) - Select a track →
Returnto play (the TUI opens in Terminal.app) - Adjust each parameter in the TUI
qto stop → reflected in z0app automatically → lock the preset- Select the next track and repeat
- When every track is done, press
Cmd+E, choose Float64 or a 16- / 24-bit delivery format in the Export window, and export - Press
Cmd+Sto save the project. Use ZCON in the Export window for 16- / 24-bit delivery (10. ZCON)
A/B testing
- Adjust a track's EQ and save the preset with
Shift+S - Change to a different setting and save again with
Shift+S(two entries in the history) Hto show the history panelTabto focus the history,↑↓to switch,Returnto revert- Compare with the original setting by ear
Applying one preset to several tracks
- Adjust and save z0Suite on the first track
Cmd+Cto copy the preset- Select the other tracks →
Cmd+Vto paste - Fine-tune each track individually
Stereo image adjustment (M/S EQ)
- Set the tool to
z0Suiteand switch Facet On with theSpacekey - Adjust vocals and bass on the Mid side (e.g. a low-mid cut)
- Adjust the stereo impression on the Side side (e.g. a high boost for width)
- Save the preset → export
Keyboard shortcuts
z0app
Global (all panes):
| Key | Action |
|---|---|
Cmd+O | Open files |
Cmd+N | New session |
Cmd+S | Save project |
Cmd+Shift+S | Save as |
Cmd+Shift+O | Open project |
Cmd+E | Export |
Cmd+D | Open the waveform editor / return to the track view |
Cmd+Z | Undo track removal |
Cmd+Delete | Remove the selected track |
Cmd+C | Copy preset |
Cmd+V | Paste preset |
Cmd+L | Toggle lock |
Cmd+, | Preferences |
Cmd+Q | Quit |
Shift+Q | Toggle Quiet Mode |
Tab | Move to the next pane |
H | Show / hide the history panel |
Track list pane:
| Key | Action |
|---|---|
↑ ↓ | Select track |
← → | Switch tool |
Return | Play / stop |
Cmd+Delete | Remove track |
q | Stop playback |
History panel:
| Key | Action |
|---|---|
↑ ↓ | Select preset |
Return | Revert to the selected preset |
Waveform editor
| Key | Action |
|---|---|
Cmd+D | Open the waveform editor / return to the track view (opens only while stopped) |
Tab | Switch HEAD (start) / TAIL (end) |
← → | Move the start / end point (accelerates when held) |
Shift+← Shift+→ | Move in 10× steps |
F / D | Lengthen / shorten the fade |
Shift+F Shift+D | Change the fade length in 10× steps |
Space | Audition |
Return | Advance (HEAD → TAIL → confirm → play) |
Cmd+↑ Cmd+↓ | Amplitude zoom |
Cmd+← Cmd+→ | Time zoom |
TUI EQ engine
Colors indicate the kind of shortcut. The word on each key is the shortest description of what it does. Values can also be entered with the numeric keypad's digits, decimal point, minus and Enter.
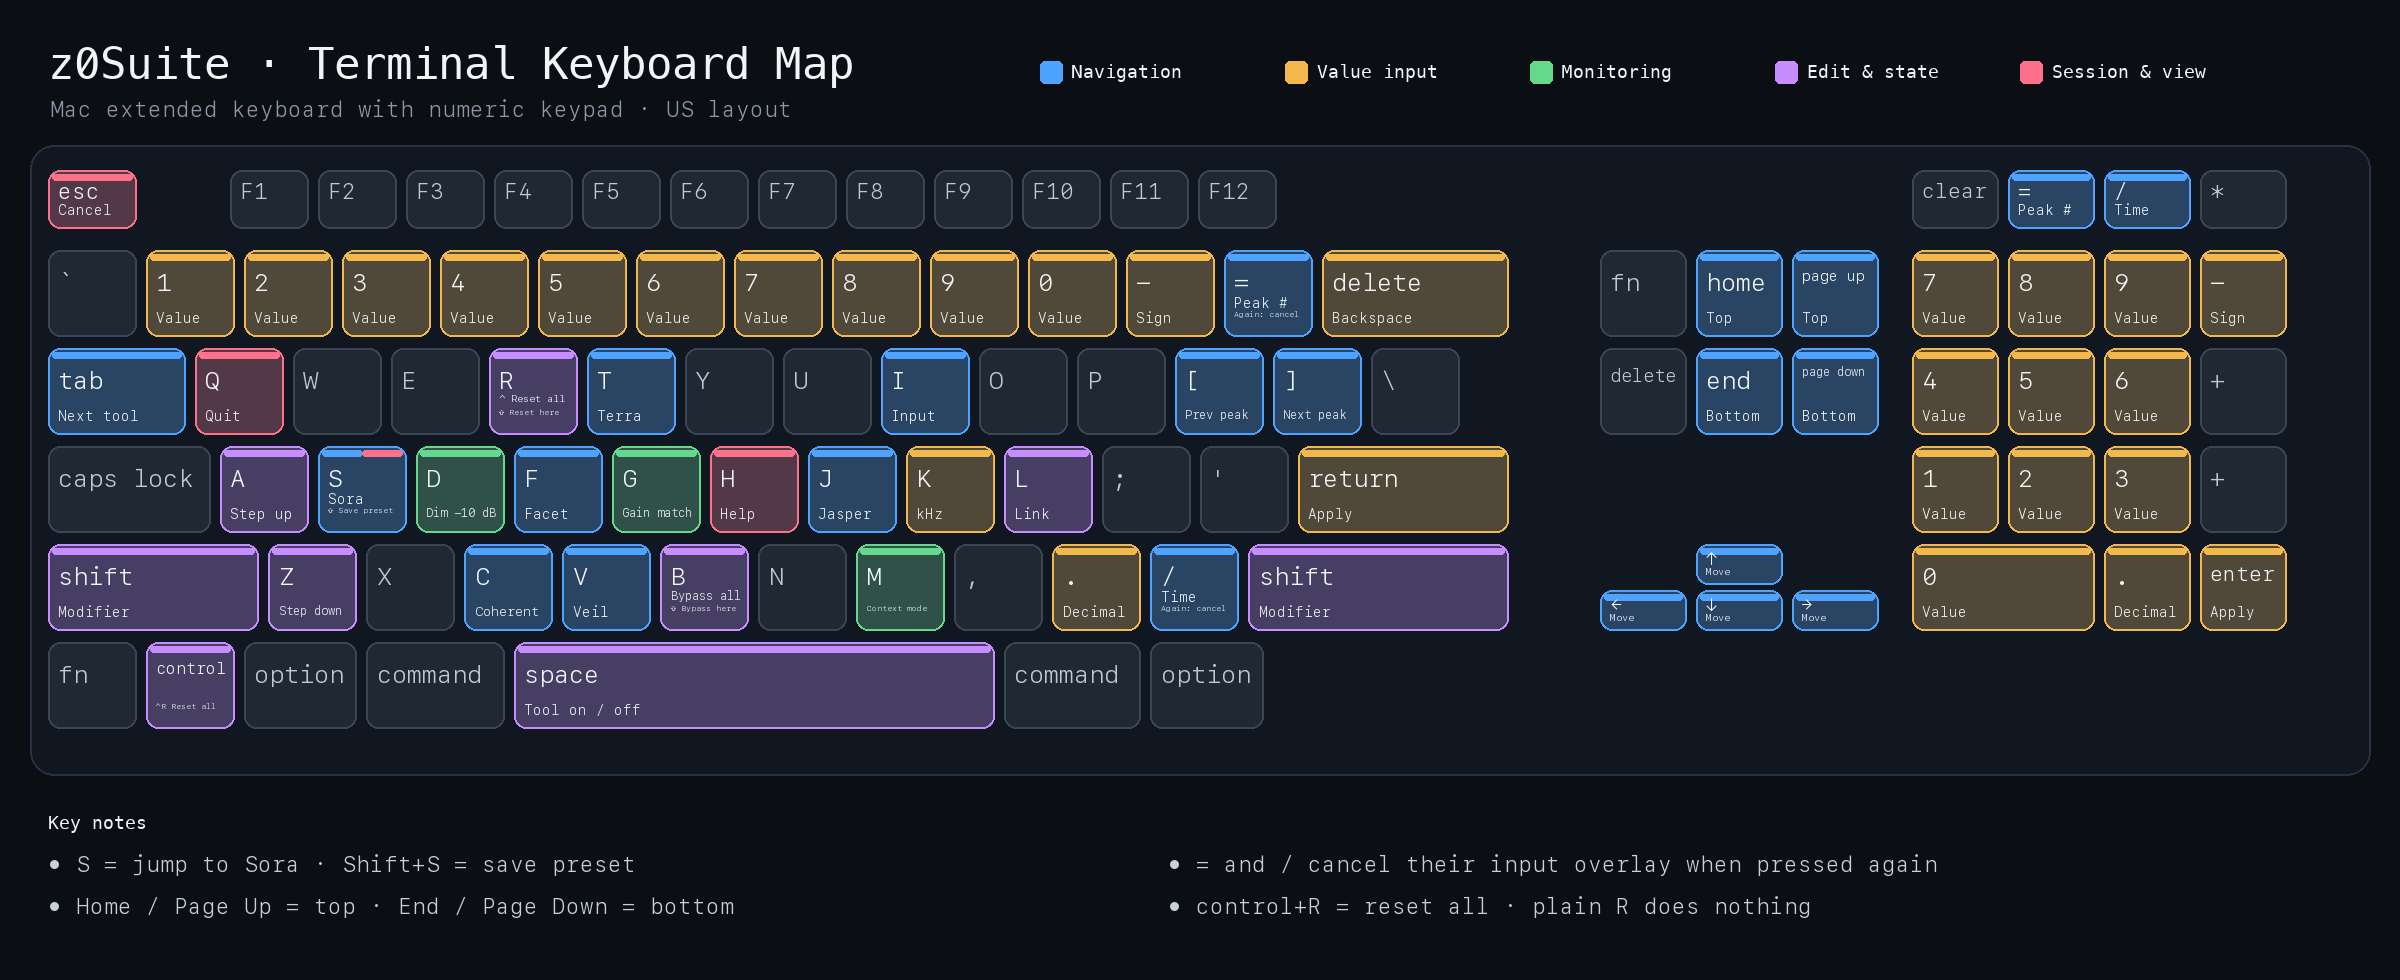
Navigation and entry:
| Key | Action |
|---|---|
Tab | Jump to the next tool / section |
Home / Page Up | Jump to the top |
End / Page Down | Jump to the bottom |
↑ ↓ | Move between rows or sections |
← → | Move left / right within the row |
0-9 . - k | Numeric entry |
Backspace | Delete a character |
Enter | Confirm and apply (re-renders in Zero Phase) |
A | Step up (applied immediately) |
Z | Step down (applied immediately) |
Commands:
| Key | Action |
|---|---|
d | Toggle Dimmer |
g | Toggle Gain Match |
h | Toggle the detailed help row |
b | Toggle bypass |
Shift+B | Bypass the tool or band at the cursor |
Shift+R | Reset at the cursor |
Ctrl+R | Factory reset everything (control + R; a plain r is ignored) |
Shift+S | Save preset |
q | Quit (auto-saves if unsaved) |
] | Jump to the next peak |
[ | Jump to the previous peak |
= | Type a peak number and jump. Press = again while typing to cancel |
/ | Type a time and jump. Press / again while typing to cancel |
z0Suite only:
| Key | Action |
|---|---|
Space | Switch the tool at the cursor On / Off |
i | Jump to the Input row |
c / v / t / f / j / s | Jump to the first row of Coherent / Veil / Terra / Facet / Jasper / Sora |
m | Input row: Mono preview / Coherent and Facet outer bands: Shelf → Cut12 → Cut24 / Veil: Listen / Terra: toggle the SC monitor |
L | Toggle Link (Input: L↔R / Facet: Mid↔Side / Veil: ThrM↔ThrS; all default ON) |
The numeric keypad's digits, decimal point and minus key are supported as well.
Specifications
| Item | Specification |
|---|---|
| Supported formats | WAV / AIFF / FLAC / MP3 / M4A / CAF (16 / 24 / 32-bit integer · 32-bit float; 64-bit float WAV is supported by every tool except Lucid) |
| Sample rates | 44.1 / 48 / 88.2 / 96 / 176.4 / 192 kHz (supported rates depend on your hardware device) |
| Platform | macOS 13 Ventura or later · Apple Silicon only |
| Not supported | DSD (.dsf / .dff) |
| Filter design | RBJ Audio EQ Cookbook · Biquad DFII-T · L2 pre-warping correction |
| Output format | Choose Float64 or 16- / 24-bit PCM WAV in Export. In Float64 mode, unprocessed tracks are copied unchanged |
| ZCON | Pure sample-rate converter. For z0Suite, 44.1 / 48 / 88.2 kHz mono or stereo linear PCM (WAV / AIFF / CAF) → 96 kHz Float64 working copy (44.1 / 48: Short FIR, 88.2: Steep FIR), and 64-bit float master → 44.1 / 48 / 88.2 / 96 / 176.4 / 192 kHz at 16 / 24-bit (two types, Short FIR / Steep FIR, default Short FIR, user gain 0.0 to −6.0 dB with a default of −0.2 dB, TPDF dither, 4× oversampled True Peak measurement, internal verification JSON) |
| Input methods | Direct numeric entry + stepped entry (Gain 23 steps / Coherent peak width P1–P6 / S 5 steps / Freq E12+E24 series, 21 steps per band) |
| Quiet Mode | Shift+Q suspends and restores background processes in one stroke (15 individually selectable items) |
| UI | Session Manager GUI + TUI (via Terminal.app) |
| Preset management | Non-destructive history · Revert · Track Lock · copy & paste · notes |
| Session management | Multiple sessions · auto-save · sidebar switching |
| Project format | .z0proj (sessions and presets saved together) |